
Over the past few years, eLearning has grown tremendously. And thanks to the internet, more people than ever before are now able to pursue their education at their own pace. The education sector must make the essential transition from traditional in-class instruction to digital learning, and the eLearning market has risen to meet this demand.
According to findings from Findstack, the eLearning market is predicted to reach $320 billion in value by 2025. These numbers are hardly surprising given the rapid expansion of eLearning in recent years.
Course creators and coaches can begin to manage their courses online by using eLearning solutions like LearnDash and implement the social elements of a real-life classroom by taking advantage of platforms like BuddyBoss.
It is quite simple to set up an online course website where you can effectively offer and share your knowledge. In this guide, you’ll learn how to use LearnDash and Buddyboss to build an online course website.
Video Tutorial – Create an Online Course With LearnDash and BuddyBoss
LearnDash Overview
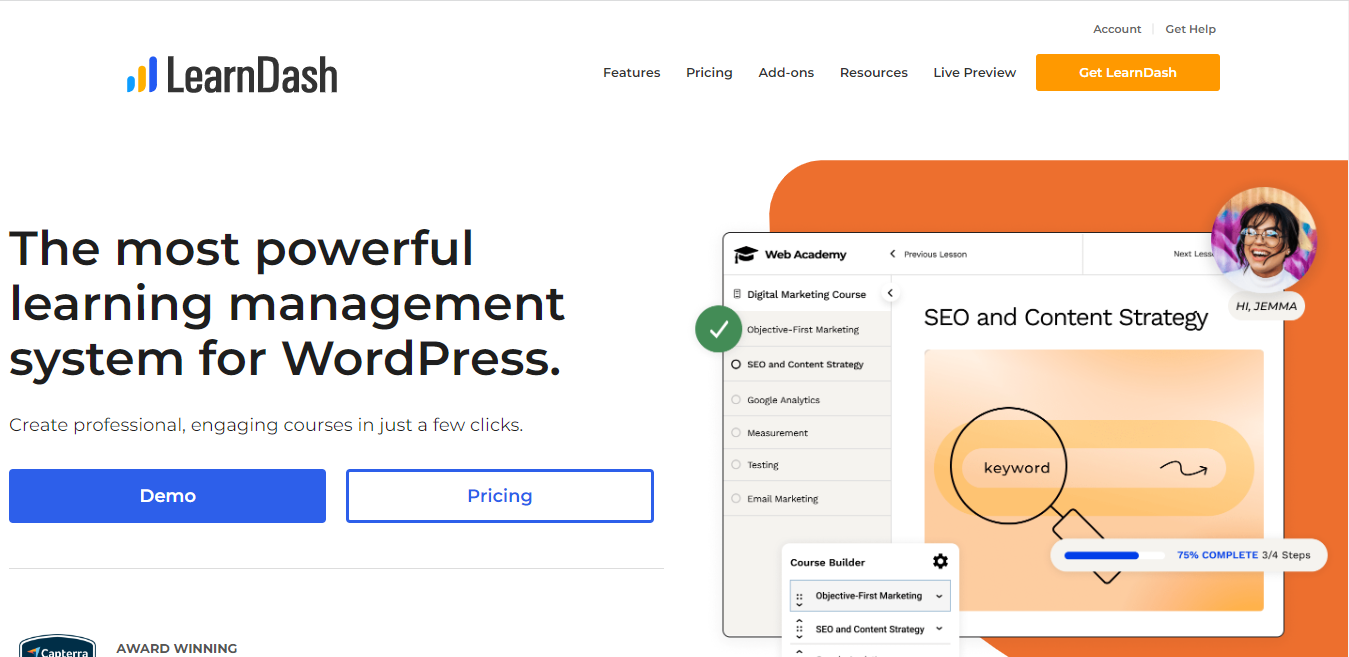
With the help of the Learndash WordPress plugin, you can quickly turn a regular website into a successful eLearning business.
This plugin is a learning management system (LMS) designed to simplify teaching and learning for both teachers and students. It enables you to teach online, publish quizzes, upload different online courses, and get student feedback.
Finding an eLearning platform that enables highly customized learning experiences that are suited to your brand, course material, and teaching methodology is challenging.
You can develop tailored experiences with LearnDash, such as those depending on student skill, personality, or feedback. You can also mix blended learning methods like live group conversations and one-on-one tutoring sessions with LearnDash.
Consider using LearnDash if you want to establish a successful eLearning website that reflects your business goals and aspirations, especially given that it enables limitless personalization and modification.
BuddyBoss Overview
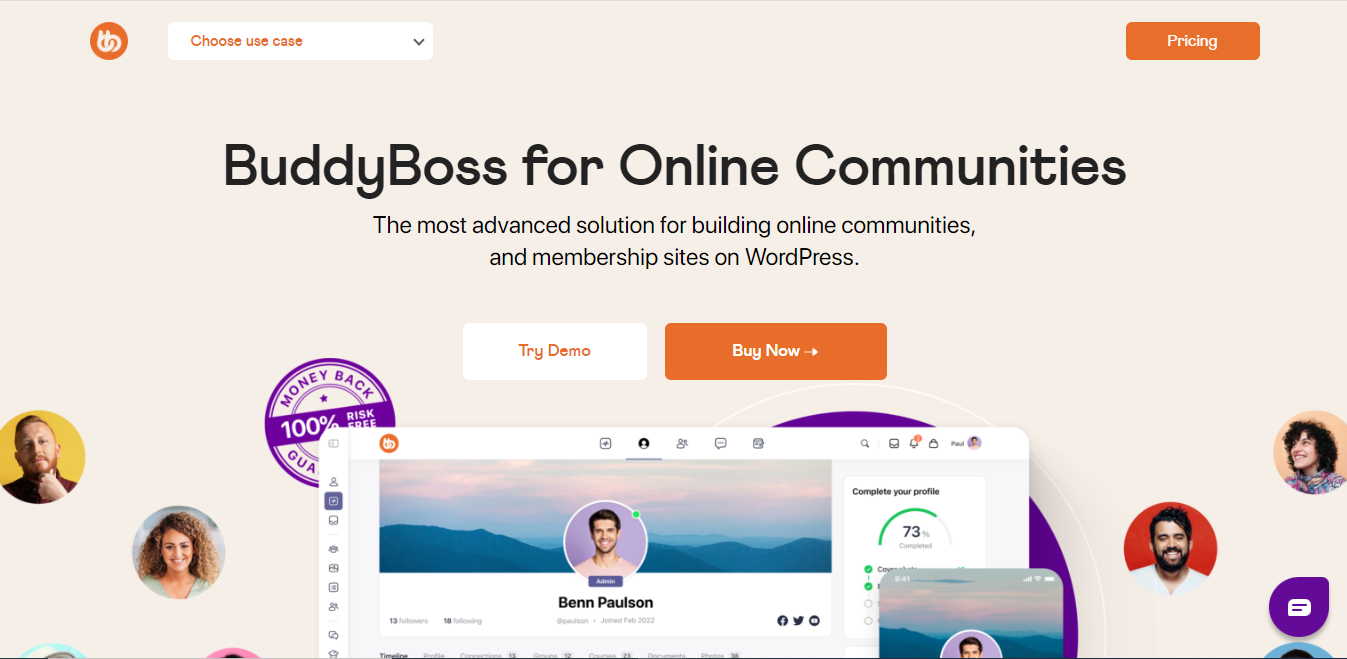
BuddyBoss is the most robust and adaptable open-source community platform that is built on WordPress.
By integrating user-generated content and robust social features, BuddyBoss enables you to draw in prospective members and students and keep them engaged on your website.
Your members and students have access to a wealth of features on BuddyBoss, including the ability to join and create groups, upload files, and media, view recent interactions through activity feeds, build their profiles, send messages to one another, and much more.
BuddyBoss allows you to build a community around your students and course material. Students can support one another, discuss problems and solutions, brainstorm ideas, and do much more around the concept of learning through activity streams, groups, and discussion forums.
You can also create an online community using BuddyBoss that sells memberships and courses in one location. The theme is fully branded to your company and functional right out of the box.
The BuddyBoss Theme transforms your website into a fully complete social networking site with open or closed groups, private chat, and substantial LearnDash integration, much like Facebook.
The BuddyBoss Theme is the only theme you will ever need to build an online community for your courses or business. It is an exceptional theme in a league of its own.
Benefits of LearnDash And BuddyBoss
LearnDash, designed for modern e-Learning businesses, is incredibly user-friendly and saves a significant amount of time. You can quickly create an LMS using the user-friendly interface, readily available documentation, and video tutorials.
LearnDash offers the best and most up-to-date e-learning methods along with dynamic, captivating courses. You can create complex course content using the course builder’s straightforward drag-and-drop feature. Courses are simply renamed and can be divided into lessons, categories, topics, and quizzes.
LearnDash offers the best and most up-to-date e-learning methods along with dynamic, captivating courses. You can create complex course content using the course builder’s straightforward drag-and-drop feature. Courses are simply renamed and can be divided into lessons, categories, topics, and quizzes.
With a variety of purchasing formats and payment alternatives, LearnDash enables e-learning professionals to create and market online courses. PayPal, Stripe, WooCommerce, and other popular channels can be used by users to receive payments.
They can create a sizable course marketplace and provide one-time courses, memberships, and subscriptions, among other things.
LearnDash was created to offer top-notch instruction through online courses. As a result, it emphasizes deep learning as well as raising completion rates and knowledge retention.
LearnDash simplifies administrative processes by emphasizing user roles. Admins can manage users, courses, assignments, quizzes, challenge examinations, and more using the customized dashboard.
You can easily create meaningful performance reports for your courses that include learners’ progress using LearnDash’s numerous reporting capabilities. These reports are portable and can be downloaded.
LearnDash also offers a library of official and third-party add-ons for extending the platform with additional capabilities. You can also rely on custom development to meet your specific needs.
At the same time, BuddyBoss is a WordPress theme that seamlessly integrates with the learning management system LearnDash to give your online courses an eye-catching and professional look. It also helps take full advantage of your site by adding social features to your learning platform.
The theme’s compatibility with the best WordPress plugins available is one of its unique qualities. Your favorite learning management systems and membership plugins are fully compatible with it, giving you even more choices for the kind of website you want to build.
Many WordPress themes solely deliver just based on this look factor, but BuddyBoss supercharges your site with some very cool features such as student profile pages and course forums.
Your students can make posts and interact with peers’ posts just like they would on social media sites like Facebook. They can also join groups, and send private messages. It almost brings Facebook groups into LearnDash or WordPress. Additionally, Zoom integrates well into the BuddyBoss platform which makes it possible for you to better integrate live sessions into students’ schedules seamlessly.
What You Need to Build an Online Course Website
You’re going to need a few tools to build a stunning online course website. A few of these are free, while others are not. However, the expense is minimal in comparison to the potential revenue from selling your information through your courses.
Although LearnDash is great, it does not immediately take care of everything for you. LearnDash provides you with the resources to create an engaging eLearning experience for both teachers and students.
This means that it is your responsibility to create that environment. We’ve listed some of the basic elements you need to follow to build your eLearning site with LearnDash and BuddyBoss below.
1. A Reliable Domain Name And Hosting Service
Since you will be hosting your courses on your website, you will want to invest in a solid web host that is fast, dependable, and provides excellent assistance. You’ll also require a domain name, which is essentially the URL of your website.
There are several hosting solutions available, but Pressidium is our top pick. It is highly dependable and fast. Support is also available around-the-clock to assist you in resolving any issues.
2. LearnDash LMS
To transform your website into a stunning course website where you can sell your content, monitor student progress, award certificates, and more, you will need a strong learning management system (LMS) WordPress plugin.
LearnDash is one of the most popular LMS plugins for WordPress. The plugin offers an extensive set of features including a course and quiz builder. Using LearnDash you can easily design courses, break them down into lessons and topics, create beautiful course pages, generate student reports, award course certificates, process course payments, and more!
Another amazing part of LearnDash is that you can utilize any number of available WordPress themes, both free and paid. However, we recommend going for one that is optimized for LearnDash and focused on e-learning.
Thousands of institutions, prominent online marketing firms, and other businesses utilize LearnDash, which speaks volumes about its dependability.
4. BuddyBoss
Themes are also essential for establishing the appearances and features that improve your students’ learning experiences when customizing your online course website to fit your aspirations and business objectives. The BuddyBoss theme is an excellent example of a modern, flexible, and responsive theme that is optimized to work with LearnDash. It also offers additional features such as student profiles, private messaging, and activity timelines, to help you build an online community of students.
BuddyBoss is compatible with page builders, making it even more friendly for course creators. With the help of WordPress plugins called page builders, you can create web pages by merely dragging and dropping items like text and photos, without having to do any coding. They’re extremely simple to use and eliminate the need to pay expensive web developers to produce visually appealing websites. The Elementor plugin is a top-notch example of a page builder plugin.
5. Other Plugins
When it comes to creating a successful online course website, plugins are everything. There are many software add-ons that assist in enhancing your website’s functionality.
A shopping cart, like WooCommerce, for instance, could be a plugin that enables you to collect payments from students all over the world and implement other advanced eCommerce options thatLearnDash does not provide by default.
You can also invest in LearnDash add-ons for improving your courses. Add-ons can help you improve your course management, build better LearnDash quizzes, enhance your course certificates, and other specific functions.
The good news is that building a fantastic eLearning site doesn’t require you to use every add-on out there.. Just focus on the necessities first, and then move on to other niche areas that you might require.
Creating An Online Course Website With LearnDash And BuddyBoss
You can build your online course website using LearnDash and BuddyBoss by following the steps below.
You can build your online course website using LearnDash and BuddyBoss by following the steps below.
Step 1: Install WordPress
We already mentioned LearnDash, a plugin that turns your WordPress website into a useful eLearning website. As a result, WordPress must first be installed on your website before it can be converted to LearnDash.
A domain name and hosting service are now required to install WordPress.
Website hosting might be compared to the home of your website if you’re new to building websites and aren’t too familiar with technical terms. It’s a location on the internet where your website is housed.
Contrarily, the address is the domain name. It’s what users type to find your website while using a search engine. Amazon.com, Facebook.com, Wikipedia.org, and more names are examples of domain names.
Pressidium offers excellent hosting and service, thus we recommend using it.
Step 2: Install And Configure LearnDash
The next step is to install LearnDash, the system that powers our eLearning platform. Install LearnDash by going to the plugins tab on your WordPress admin dashboard.
It’s time to install LearnDash once you’re inside WordPress. The installer (it is a .zip file) and license key are available after you buy LearnDash. By heading to Appearance > Plugins > Add New > Upload Plugin in WordPress, you can upload the .zip installer to install LearnDash.
The plugin must then be activated by clicking Activate after installation.
You have now successfully installed and activated LearnDash on WordPress. The license needs to be activated first, which you can accomplish by heading to LearnDash > Settings. To enter your email address and license key, switch to the LMS License tab. After entering the information, click Update License.
Then, if you wish to accept payments online for your course, you must set up your payment preferences. You can enter your PayPal email address, currency, country, and other information by selecting the PayPal Settings option. Once you’re done, click Save.
Make sure you’re using LearnDash 3.0 rather than Legacy. This is another thing you should do. Go to the General tab to accomplish this. The option to select an Active Template is available here. To access cutting-edge features like the Focus Mode, make sure LearnDash 3.0 is chosen rather than Legacy.
The Focus Mode, which is applied site-wide, gives your students a distraction-free experience by removing extraneous page components like sidebars and other widgets. This also makes it simpler for you to design a stunning, expert-looking course website without having to manually change each of your pages.
Step 3: Install BuddyBoss
Your selection of a theme will either help you capture and hold the attention of your students or cost you, students, to your competitors.
We will set up the BuddyBoss theme and Elementor page builder for this tutorial.
Select Plugin > Add New and type “Elementor” into the search bar to install the plugin. Select Install and Activate.
The BuddyBoss theme can be fully installed by following the instructions below after being purchased and downloaded:
- Go to Appearance > Themes in your WordPress dashboard after logging in.
- Click Add New and Upload.
- Locate and upload the “buddyboss-[version].zip” theme file then click Install.
- Locate and upload the “buddyboss-child-[version].zip” theme file then click Install.
- As your primary theme, activate the “BuddyBoss Child Theme.”
These options are now accessible via Appearance > BuddyBoss and Appearance > Customize.
With the BuddyBoss Theme and the Elementor plugin combined, you can select from more than 100 stunning full-page WordPress templates and personalize them to fit your style.
Additionally, BuddyBoss and LearnDash can be integrated. BuddyBoss has gone above and beyond to make sure that its themes are compatible with LearnDash, making it even easier for the two to collaborate and use it to sell content and create communities.
Step 4: Create Your Course With LearnDash
Once the foundation of your website is in place, you can begin building courses.
It’s time to add your content or courses now that the front end of your website looks fantastic.
LearnDash has an incredible course builder that makes creating courses as easy as dragging and dropping lessons and topics.
All of the courses on your website are listed under LearnDash > Courses. By clicking on the titles of the imported courses, you can edit them, or you can start from the beginning and create a new course. Click Add New to start a new course.
After that, you will be brought to the course editor. Name your course and include a brief description. A featured image can also be added.
Then select the Settings tab to customize the course’s settings. You can add course materials, assign a course certificate, set course prerequisites, and more in this area.
It is always good to publish as you go because you can lose your progress very quickly.
Additionally, you may control who has access to your course if you scroll down. You can make it available to everyone on your website, including visitors who aren’t registered, or you can charge a one-time or ongoing cost to use it.
You can choose the course pricing by selecting “Buy now.” You can choose the course fee and the billing cycle for the Recurring option.
Step 5: Add Lessons and Sections to Your Course
After finishing the course setup, switch to the Builder tab at the top to begin building your course’s outline. It’s okay if all you have is an outline since you can always go back and add more information to your lessons.
Clicking New Section Heading will allow you to add section headings, to begin with. Since sections are merely a technique to arrange the flow of your course, much like a chapter title in a book, you cannot add material to them.
Then, by selecting New Lesson, you can add a new lesson. Lessons may be added in any number, and their placement may be changed by dragging them somewhere else or by using the up and down arrows on the side buttons.
A new lesson can also be created by heading to LearnDash > Lessons > Add New.
Adding content to each lesson would be the following stage. You can accomplish this in the course builder by clicking Edit while your mouse is over the lesson you want to change.
The lesson editor will be open for you to add text, pictures, videos, and other elements. You can add as much content as you like and design the lesson page however you like.
When you’re finished with the content, click Settings at the top to further edit your lesson. If your courses are in video format, you may enable video progression here. You can also allow students to post assignments, assign the lesson to a certain course, and establish the lesson access preferences here.
Lesson access settings are located further down the page, where you can link a lesson to a certain course.
Additionally, LearnDash has a drip-feed option that allows you to decide when your courses will be made available to your students. You can specify the number of days after enrollment when the lesson will be made available to your students if you select the Enrollment-based option.
The LearnDash course builder takes care of everything, allowing you to concentrate solely on developing lessons that benefit your audience.
Step 6: Organize Your Lessons Into Subtopics
A great technique to prevent information overload for your students is to break a lesson that covers several topics and becomes too long into smaller topics.
You can add subjects to a lesson by going to LearnDash > Topics > Add your first topic. Click Add New if this is not your first topic.
You can edit topics in the same way that you edit lessons by adding a title, a featured image, and any additional content, including text, pictures, embedded videos, and other media.
You can access the topic’s settings page by clicking Settings. You can assign topic materials here and enable features like assignment submissions, video advancement, and a timer.
Under the Topic Access Settings, you can also designate the topic to a course and a lesson.
Step 7: Add Quizzes to Your Course
You might want to use assignments and quizzes to gauge your student’s progress as a course creator. Although LearnDash has many sophisticated capabilities, generating quizzes and assignments are quite easy with it. This allows you to get the most out of each quiz and assignment you create.
Go to LearnDash > Quizzes > Add New to add a new quiz. Give your quiz a title and a brief description, just like you would for courses and topics. After that, adjust its settings by clicking the Settings tab.
You can link a quiz to a course and lesson, set question prerequisites, and only allow logged-in users access under the Quiz Access Settings.
You can set the passing score, issue a quiz certificate, restrict quiz retakes, demand that all questions be answered, and even set a time restriction in the Quiz Progression and Restriction area, which can be found by scrolling down.
More choices can be found by scrolling down, including the ability to allow quiz materials, permit the quiz to start automatically, select how questions will be shown, and more. These settings are quite sophisticated and will allow you to evaluate your students as effectively as possible. Click Update once you’re finished.
It’s now time to include questions in your test. Go to LearnDash > Quizzes to accomplish that. Click Questions when your cursor is above the quiz you wish to add questions to.
You can access the question editor by selecting one of the Add Questions icons. You can add the actual question, choose the number of points it is worth, choose the messages that will appear if the student answers the question correctly or wrong, and other options inside the question editor.
Additionally, you can choose the sort of response, such as a single choice, multiple choice, essay, fill in the blanks, etc. When you click on a response type, a dropdown menu with further settings for that answer type will appear.
Step 8: Add Assignments to Your Lesson
By heading to LearnDash > Lessons and editing the lesson you want to add an assignment to, you can now add assignments to specific lessons. Click the Settings tab after entering the lesson editor.
You can choose to enable Assignment Uploads from the Display and Content Options menu. Activate this option. Additional choices will then be displayed, including the permitted file types, the file size restriction, the number of points for the assignment, and whether or not it will be graded automatically or manually.
In your lesson, be sure to include instructions for the assignment. To save your changes, click Update.
The option to post their assignments will be available to students at the conclusion of the lesson.
By heading to LearnDash > Assignments on the backend, you can view completed assignments.
Conclusion
Now that you’ve seen how simple it is to use LearnDash and BuddyBoss to build a stunning WordPress website for an online course, we sincerely hope that you will act and spread your content.
You can quickly and easily design stunning course websites with LearnDash and BuddyBoss If you have the necessary technical know-how or with the help of LearnDash experts like the WooNinjas.
We recommend the LearnDash Quick Launch service if creating an online course website from scratch seems daunting.


