
It is no secret that BuddyBoss/Social Learner theme is one of the best ones out there if you are looking to create an online learning community with some social learning aspects. BuddyBoss not only helps you create a beautiful layout for your LearnDash courses, but it also helps increase user engagement. In this article, we take a look at how you can set up LearnDash with BuddyBoss AND use the LearnDash Buddy Up Add-on with the BuddyBoss theme efficiently.
What is LearnDash Buddy-Up Add-on?
The LearnDash Buddy Up add-on gives you the authority of letting users of the same course create groups. These groups will be primarily there to create a classroom-like environment for the students by allowing them to socialize among their peers. The groups will also let them hold discussions regarding their course. It also provides some other really cool features like, live chat, group management and compatibility with LearnDash Groups. If you are interested in checking out a live demo of the add-on with the BuddyBoss/social learner theme, please send us a message.
So let’s dive in.
See how you can use the amazing LearnDash Buddy-up Add-on with the famous BuddyBoss theme to drive more engagement for your online courses. Share on XSetting Up LearnDash with BuddyBoss:
In this section, We are going to show you how to configure your LearnDash plugin, so that it will work perfectly with the BuddyBoss theme.
Install the BuddyBoss Theme:
Follow these simple and easy steps to install the BuddyBoss theme:
- From WordPress dashboard navigate to Appearance > Themes.
- Click Add New.
- Click Upload Theme.
- Select the BuddyBoss zip file.
- Click Install Now.
- Click Activate once the theme is installed.
- Navigate to BuddyBoss from your WordPress dashboard > License Keys.
- Enter the License key and click Update License.
Install the LearnDash Plugin:
Follow these steps to install and configure the LearnDash plugin:
- Navigate to Plugins > Add New.
- Click Upload Plugin.
- Select the LearnDash zip file.
- Click Install Now.
- Click Activate.
- Navigate to LearnDash from your WordPress dashboard > Settings > LMS License.
- Enter the License key and click Update License.
- Navigate to LearnDash > Settings > General.
- Select LearnDash 3.0 for the Active Template field.
- Save the settings.
- Navigate to LearnDash > Course > Add New.
- Add new courses (lessons, topics, and quizzes).
Note: BuddyBoss theme supports LearnDash 3.0 and above.
Single Course Page:

Install and Configure the LearnDash Buddy-Up Add-on:
The LearnDash Buddy-Up add-on is an amazing tool to increase engagement on your LearnDash LMS. With this add-on, users can easily buddy up and interact, chat with one another in the groups. These groups will be primarily there to create a classroom-like environment for the students by allowing them to socialize amongst their peers. The groups will also let them hold discussions regarding their course.
Follow these steps to install and configure the LearnDash buddy up add-on:
- Navigate to Plugins > Add New.
- Click Upload Plugin.
- Select the LearnDash buddy up add-on zip file.
- Click Install Now.
- Click Activate.
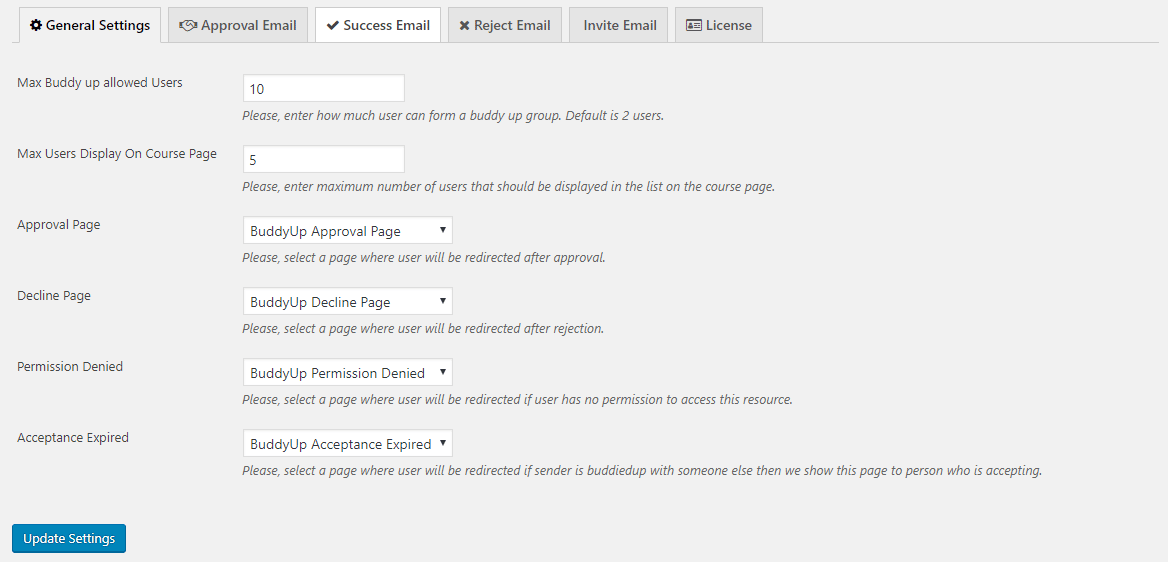
- Navigate to LearnDash > Buddy Up Settings.
- Navigate to LearnDash from your WordPress dashboard > Buddy Up Settings > License.
- Enter the License key and click Activate.
- Configure the Buddy Up add-on to your liking. Using Buddy Up settings allows you to select max buddy up allowed users, max users display on the course page, you can select different custom pages like Approval Page, Decline Page, Permission Denied, and Acceptance Expired. Plus you can configure different emails like Approve email, Reject email, Success email, and Invite email.
LearnDash Buddy-Up comes up with some outstanding features. Let’s take a look at these features:
Buddy Groups:
Through LearnDash Buddy-Up add-on students can create a group, make friends, engage in live chat in that group can learn much more with their mates.
Now you can create multiple chat groups running side by side for various courses.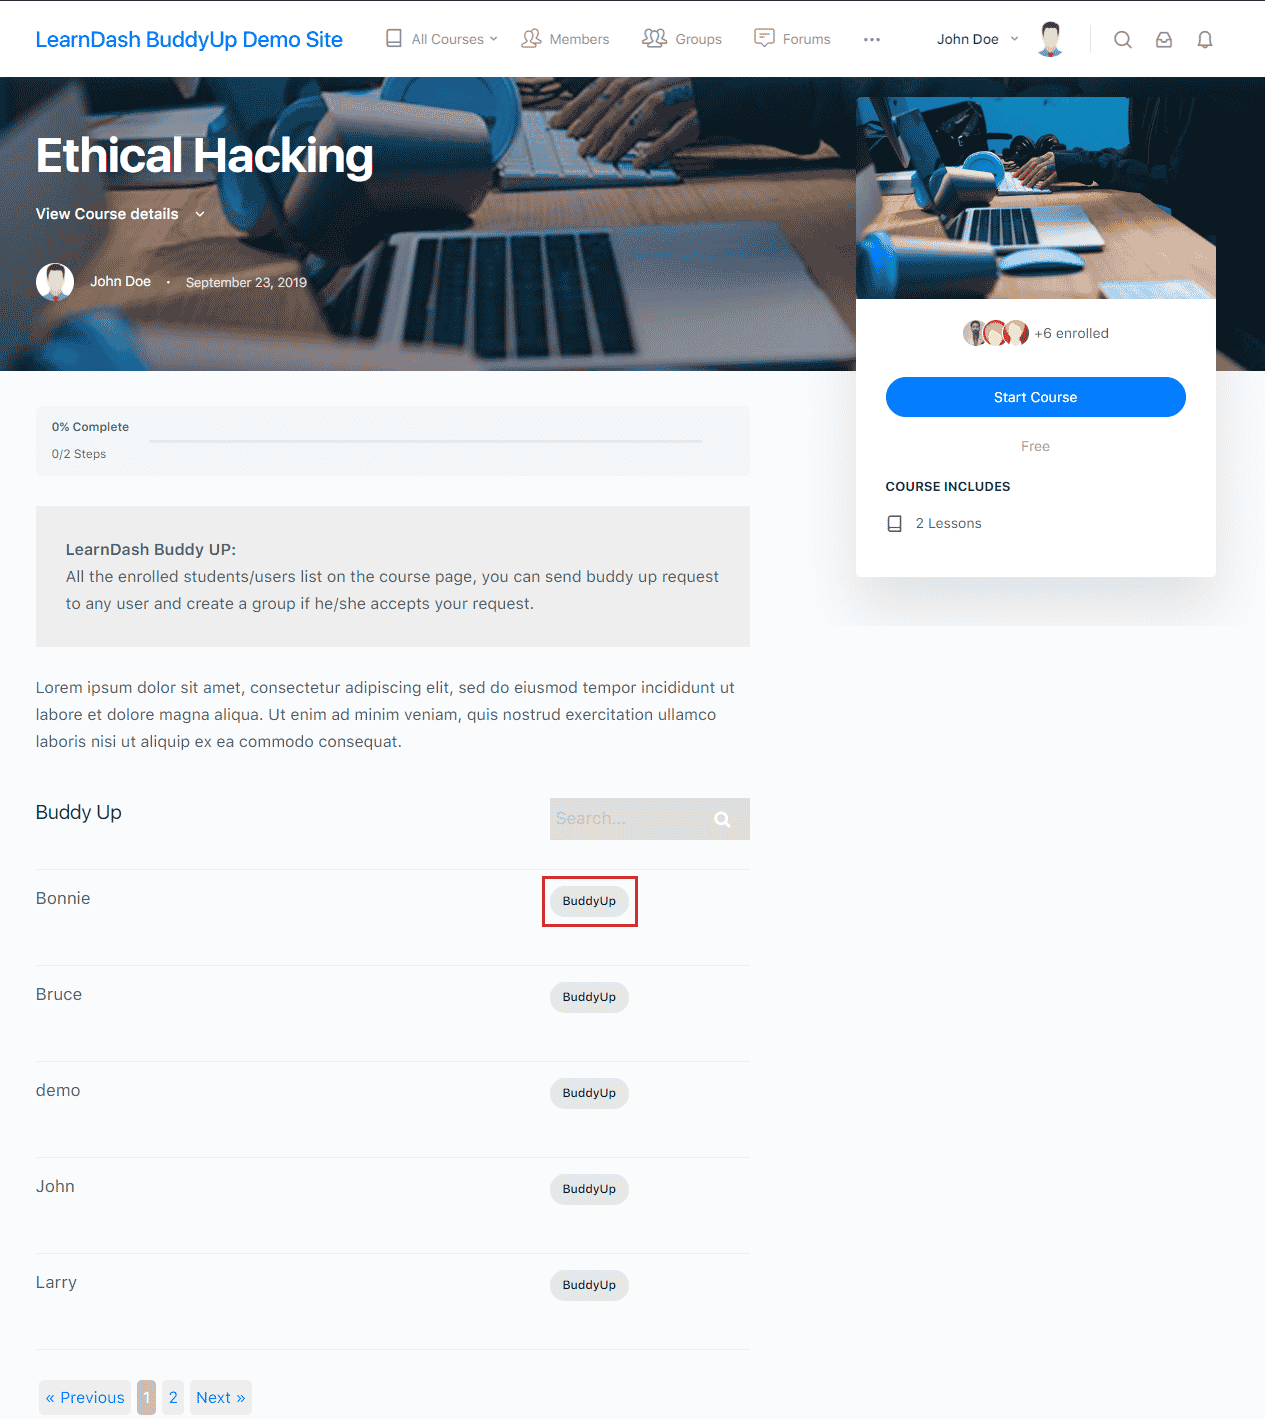
Invite Students to Buddy Up Groups:
Once the buddy up group is created, the students can invite other registered students into this group by simply clicking the Buddy Up button.
In LearnDash buddy-up the user has full control to be buddied up or not. 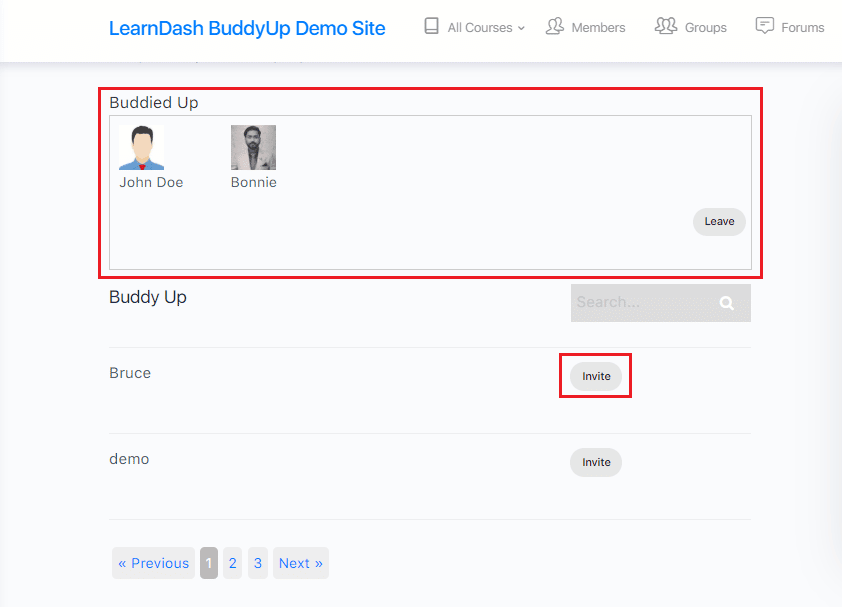
Live Chat:
The add-on lets your students from the same course create groups to hold discussions regarding their courses via live chat functionality. 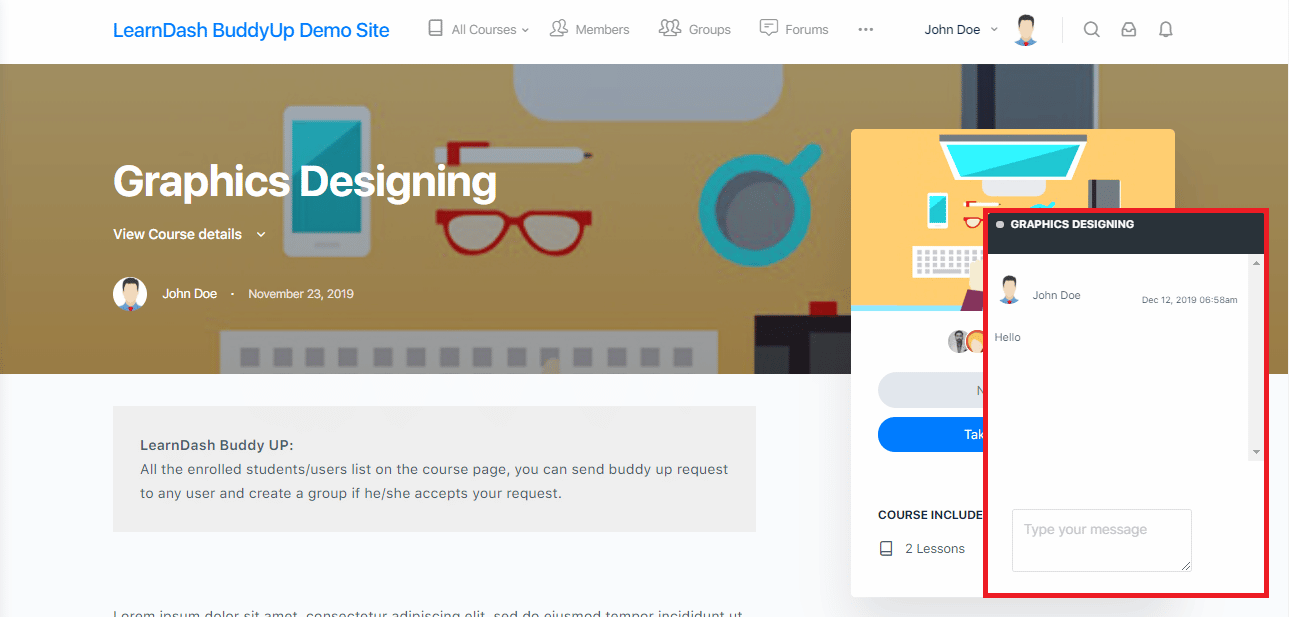
Allow/Disallow on Specific Courses:
The LearnDash Buddy-Up add-on allows you to enable or disable the buddy up functionality for any specific course(s). 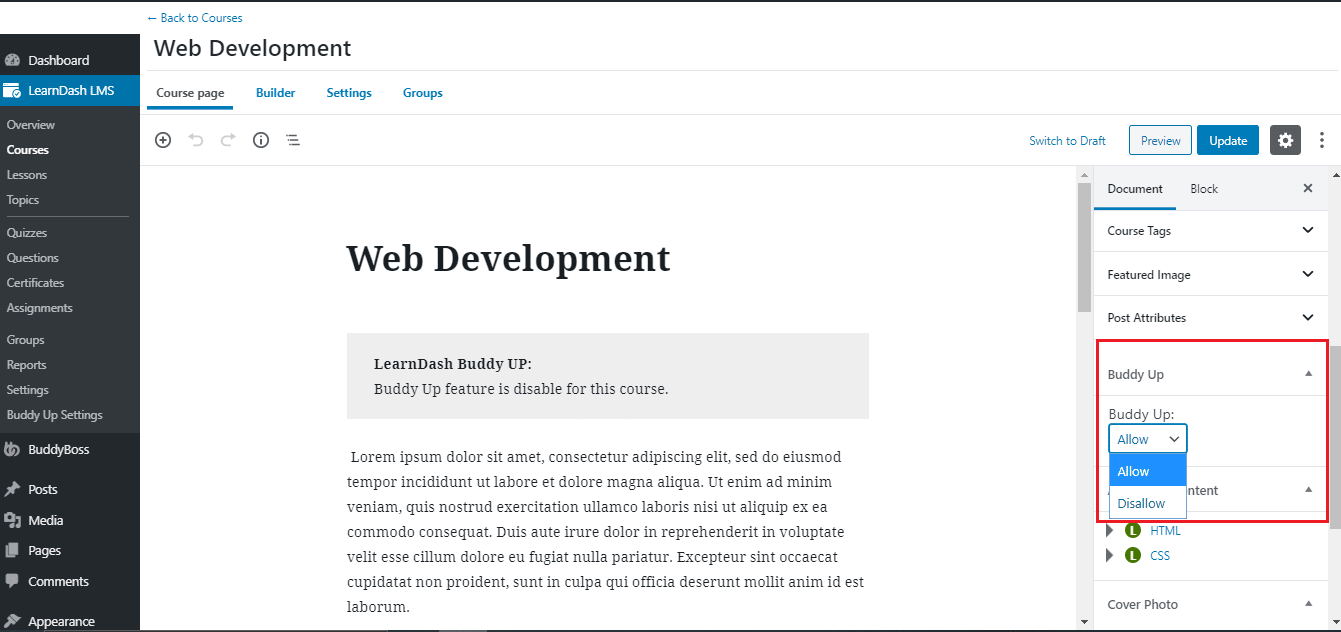
Allow/Disallow Specific Users:
The LearnDash Buddy-Up add-on allows you to enable or disable the buddy up functionality for any specific user(s). 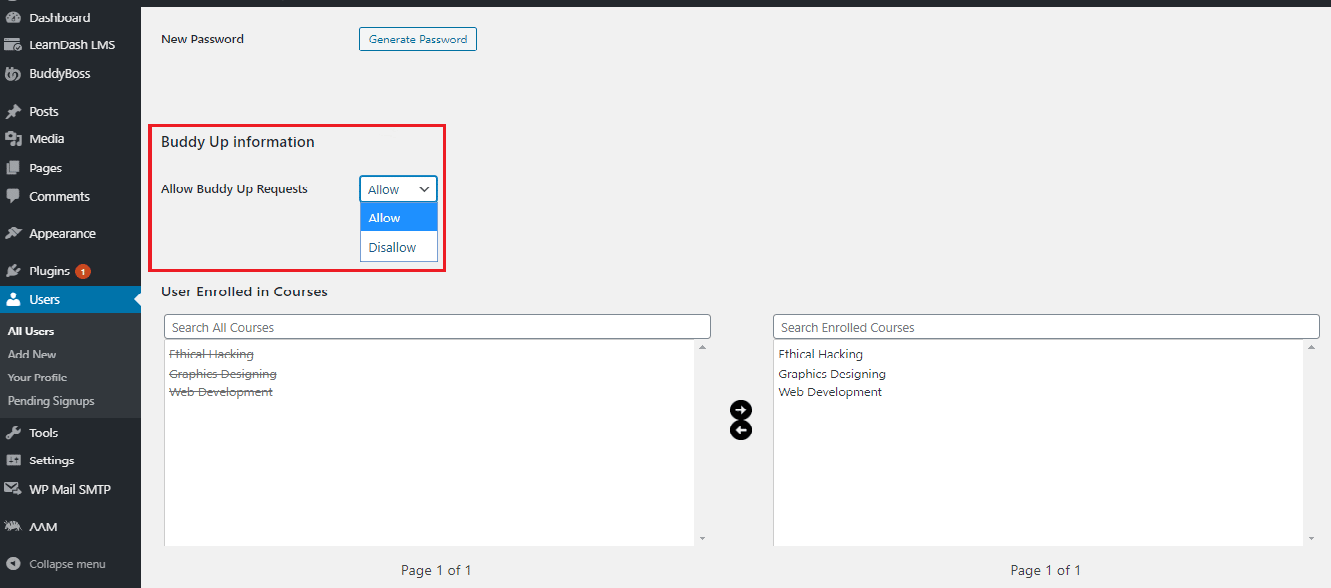
LearnDash Groups Compatibility:
LearnDash Buddy-up add-on is fully compatible with LearnDash groups. That means if the admin has added a user in a LearnDash group and the user registers a course, he/she can create a group and can buddy-up with any user in that same LearnDash group also.
The LearnDash Buddy up add-on helps you to make your LearnDash courses more classroom-like. The group study via live chat feature not only helps students stay motivated and connected but also keeps them determined to finish their courses and move to the next ones.
BuddyBoss is the perfect theme for a social network, with an ultra-responsive layout. You can use this combo (LearnDash + LearnDash Buddy-Up + BuddyBoss) to help your users to learn from each other and increase the value of your LMS, all while reducing your workload.
If you need any assistance with the LearnDash Buddy up add-on, don’t hesitate to drop us a line here or through our contact form and one of our Ninjas will be in touch asap.


