AffiliateWP Stripe Payouts allows you to pay your affiliates from your Stripe account with a single click. This add-on also allows you to automate payments by scheduling the payouts individually and in bulk. As a result, you can dramatically decrease the amount of time you spend processing payouts, giving you more time to run your business. At the same time, you will be able to boost affiliate satisfaction by giving them quick access to their funds.
This document will walk you through the steps you need to follow to pay your affiliates through Stripe.
Video Tutorial
Watch the tutorial video below for a quick walkthrough of the add-on’s features and setup process.
For detailed instructions, please continue reading the full documentation. If you still have any questions, feel free to submit a support ticket.
Prerequisites
- AffiliateWP (Installed and Activated).
- The site admin should have a Stripe standard account.
Installation
- Install and activate the AffiliateWP plugin.
- Install and activate the AffiliateWP Stripe Payout.
- There will be a sub-menu labeled “Stripe Payout Settings” under the menu of Affiliates on the WP Dashboard.
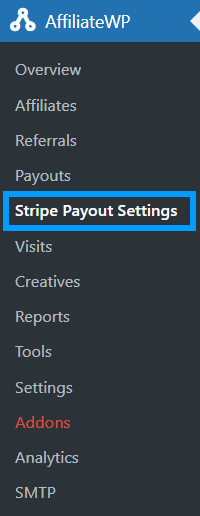
Stripe Payout Settings
Navigate to Affiliates > Stripe Payout Settings from the WP Dashboard. Here you will find the general settings for all the features this add-on offers.
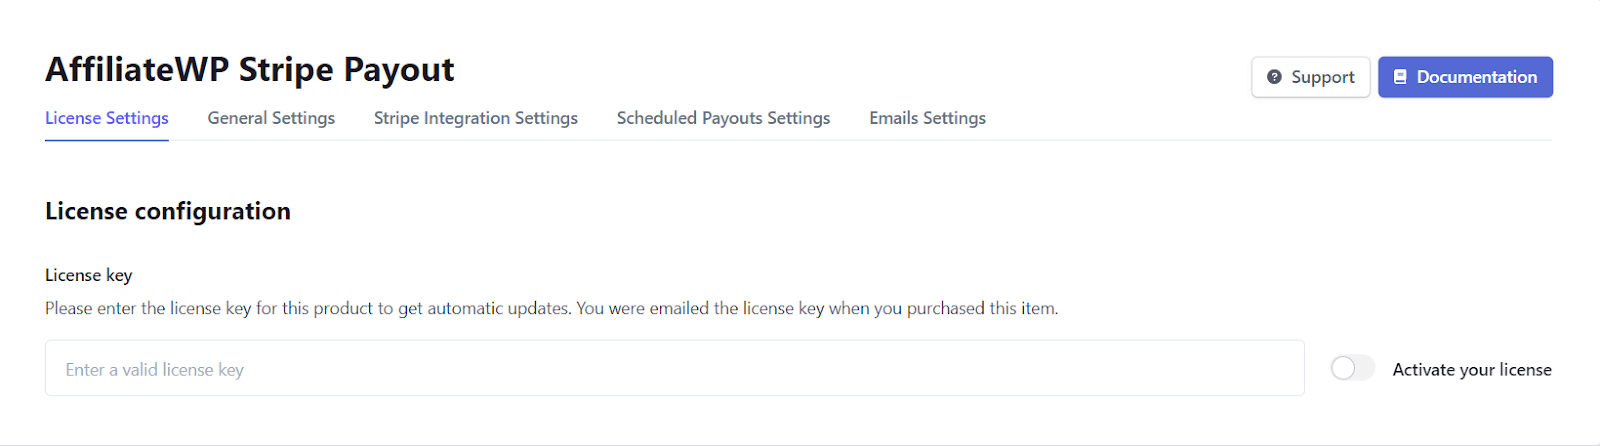
License Settings
The license key can be added here. Place your license key in the field and click on Activate. License keys can be found in the email received when you purchased the addon.
Stripe Integration Settings:
Navigate to Affiliates > Stripe PayoutSettings > Stripe Integration Settings. Here you will find all the settings you need to integrate the Stripe Account with this add-on in order to pay AffiliateWP referrals.
General Settings
Under this tab, you will find the general settings for the add-on. The options that are enabled will come into effect if you deactivate the add-on.

- Delete Stripe integration settings
Select “yes” if you want to delete all Stripe Integration settings once the plugin is deactivated.
- Delete affiliates’ Stripe account connections?
Select “yes” if you want to delete all Stripe account connections once the plugin is deactivated.
- Delete payout schedules?
Select “yes” if you want to delete all schedules once the plugin is deactivated.
- Delete admin email settings
Select “yes” if you want to delete all admin email settings once the plugin is deactivated.
- Delete affiliate email settings
Select “yes” if you want to delete all affiliate email settings once the plugin is deactivated.
- Enable logging
Enable toggle if you want to save the logs. Stripe integrations will store the system log in the WordPress upload folder.
- Delete logs
Enable toggle if you want to delete all of the recorded logs from the upload folder.
- Shortcode
You can add this shortcode [awp_stripe_payout] to any page to display the Stripe Payouts tab on the frontend.

Stripe Integration Settings
Under this tab, you will find all the settings you need to integrate your Stripe API and Stripe Account with the website.

- API Access Mode
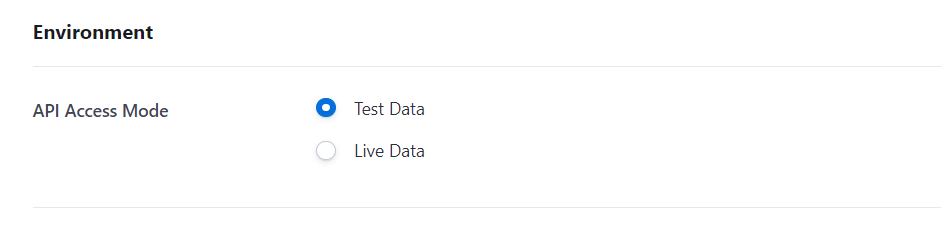
This option lets you select the working environment of your plugin. The Stripe API will work according to your selection from Test Data or Live Data.
Note: Make sure that all provided keys are related to the selected environment.
You can switch between Stripe environments inside the Stripe dashboard to fetch related keys and screens.


- Stripe Account ID
This field lets you enter your Stripe Account ID to integrate your Stripe account with our plugin.
Note: The account ID is found by scrolling down on the Profile page when you log into your Stripe account.
Stripe Account:


- Enable Cross-border Payouts
Here, you can enable this option if you want to pay affiliates in different regions. Please note that Stripe charges additional fees for cross-border transactions.
If the option is disabled, then the affiliates of the same region (with the same currency) will get their respective amount transferred to their connected Stripe account (in the “Affiliate Area → Stripe Payouts” tab). If the affiliate is in a different region (with a different currency), then the amount transfer will not be successful, and you will see the following message.


Similarly, if the option is enabled, then the affiliates of the same region (with the same currency) will get their respective amount transferred to their connected Stripe account (in the “Affiliate Area → Stripe Payouts” tab). If the affiliate is in a different region (with a different currency), then the amount transfer will be successful, and you will see the following message. However, kindly note that Stripe will charge a conversion amount fee for the Cross-border Payment.

If the payment is successfully transferred, then the affiliate will be able to view the transaction record on their connected Stripe account.


Kindly note that if the referral is paid (by Stripe), you set its status back to unpaid and try to pay the referral again, then you will not be able to do so.

- API Keys:
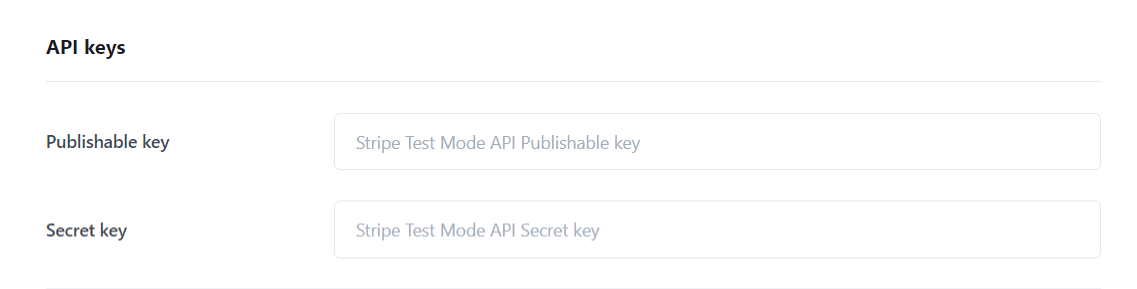
- Publishable Key
Log in to your Stripe Account and navigate to Developers > API keys from the left side menu; there will be a Publishable Key under Standard Keys. Paste it here.
- Secret Key
The secret Key is also located in the Standard Keys section. Copy and paste it into this field.
Here is where the keys will be located on your Stripe Account:

On a successful integration of the Stripe Account, the widget on the right will show a summary of the connected Admin account.
Note: If you want to know more about Stripe Keys, read about them on the official Stripe Doc.
- Connect Settings
These settings are needed to allow the affiliates to be able to connect their Standard or Express Stripe account with the Admin’s Stripe account so that the payouts to the affiliates can be swift and hassle-free.
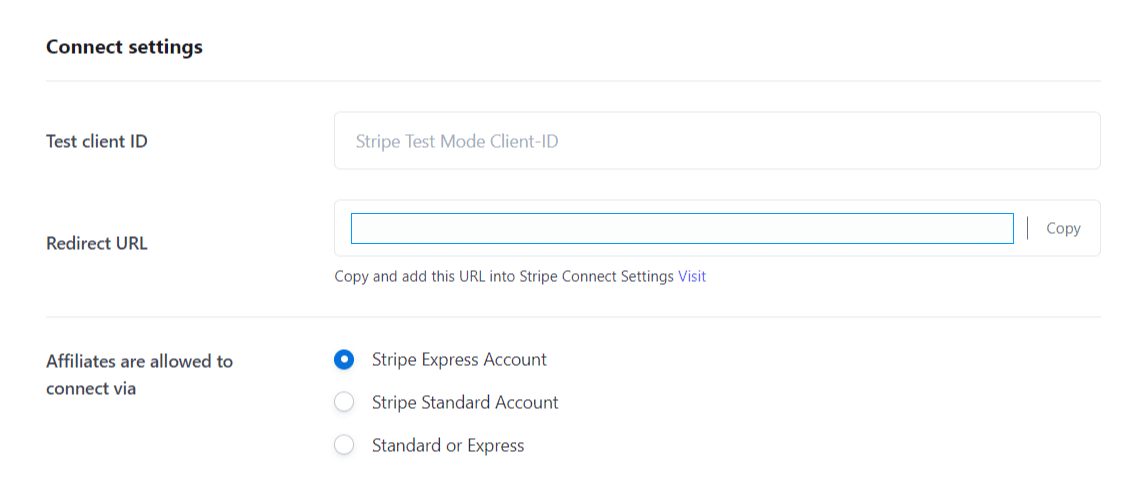
- Live Client ID
Navigate to Settings > Connect > Onboarding options > OAuth (tab) from the Stripe Account. Copy the Live Client ID and paste it here in the Live Client’s text field.


- Affiliates are allowed to connect via
Here, you can determine how your site’s affiliates can connect their own Stripe accounts from the frontend.
- If you select “Stripe Express Account”, only Express accounts can be connected on the frontend.
- If you select “Stripe Standard Account”, only Standard accounts can be connected on the frontend.
- If you select “Standard or Express”, affiliates will be able to choose whether to connect their Standard or Express Stripe account.
Please note that a connected account can be of one type only (Standard or Express), and once a user account is created, the account type can’t be changed.
Be sure to double-check the OAuth settings by navigating to Settings > Connect > Onboarding options > OAuth (tab) from Stripe’s Account.
Stripe:

There will be a section of Redirects just below the OAuth settings; copy and paste the URL from the Redirect URL field on the add-ons backend by navigating to Affiliates > Stripe Payouts Settings > Stripe Integration Settings > Connect Settings.


Stripe Connect Branding:
The above configuration will enable the connect onboarding on your site; its configuration is required to set up the Branding details on your integrated Stripe account. Navigate to the Settings > Business settings and tap on more and select the branding section and provide a business name and other details according to the screenshot.

And these details will be displayed on the Stripe onboarding connection form when an affiliate connects their account from the affiliate area.
- Account WebHook
This Stripe webhook is required to be configured with all events or at least the following events, which will be used for email notifications.
- Transfer. created
- Transfer. reversed
- Transfer. updated
Start the configuration process by navigating from the Stripe dashboard to Developers > Webhooks and clicking on the “+ Add destination” button.

After clicking the destination, you have to choose which account the destination listens to. Select the “Your account” option.

After choosing the “Your account” option, scroll down and select events from the Events section. After choosing the events, click on the continue button.

Select the “Webhook endpoint” option and click on the continue button.

Scroll down to the section of Account WebHook, from copy the URL from the Affiliates > Stripe Payouts Settings > Stripe Integration Settings > WebHook URL.

On the next screen, paste the account webhook URL you copied into the Endpoint URL field. Finally, add a description and click the “Create destination” button.

- Signing Secret
After the integration of the Account’s WebHook, there will be a signing secret key on the configured endpoint on the path Developers > Webhooks > Click on the URL, after the successful integration of the WebHook.

Click on the “Reveal secret” button, copy the key and paste it into the Signing Secret field.

- Application WebHook
This stripe webhook must be configured with all events or at least the following events, which will be used for email notifications.
- account.application.authorized
- account.external_account.updated
- account.application.deauthorized
- account.updated
- payout.paid
- Payout.failed
Start the configuration process by navigating from the Stripe dashboard to Developers > Webhooks and clicking on the “+ Add destination” button.

After clicking the destination, you have to choose which account the destination listens to. Select the “Connected and v2 accounts” option.

After choosing the “Connected and v2 accounts” option, scroll down and select events from the Events section. After choosing the events, click on the continue button.

Select the “Webhook endpoint” option and click on the continue button.

On your WordPress Dashboard, scroll down to the section of Application WebHook and copy the URL from the Affiliates > Stripe Payouts Settings > Stripe Integration Settings > WebHook URL.

Now paste the account webhook URL you copied into the Endpoint URL field.

Add a description and select the events from the “Select events to send” options.
Signing Secret
After the integration of the Application’s WebHook, there will be a signing secret key on the configured endpoint on the path Developers > Webhooks > Click on the URL, after the successful integration of the WebHook.

Click on the “Reveal” button, copy the key and paste it into the Signing Secret field.

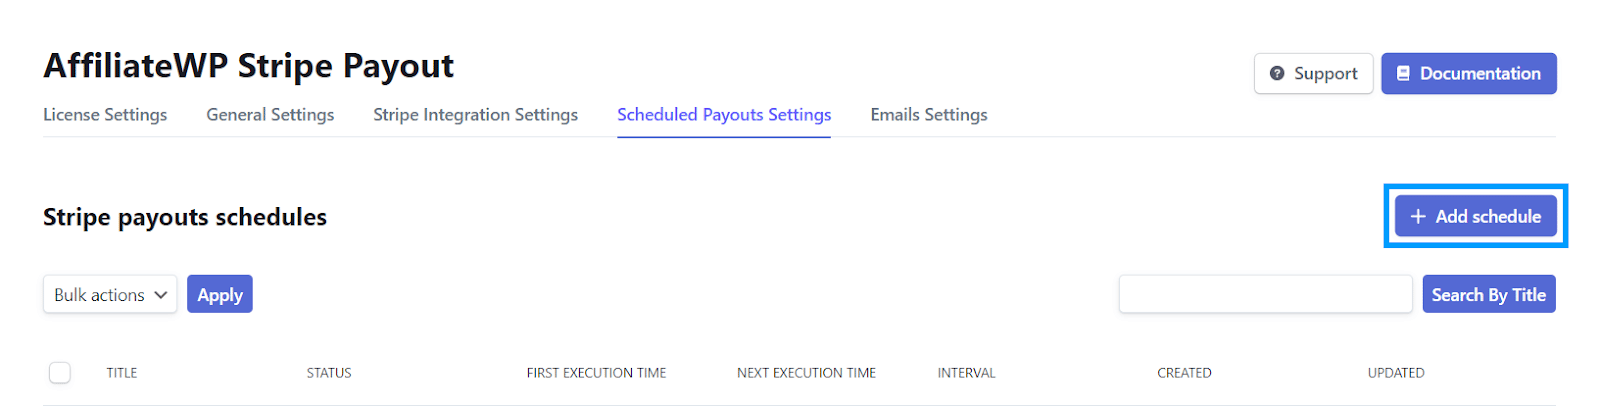
Scheduled Payouts Settings
From this tab, you can schedule automatic payouts to your affiliates by creating a schedule.
The included affiliates will receive the Stripe transfer and will be notified by email.
To add a Stripe payout schedule, follow these steps:
1- Navigate to Affiliates > Stripe Payout settings > Scheduled Payouts Settings and click on “Add New Schedule.”
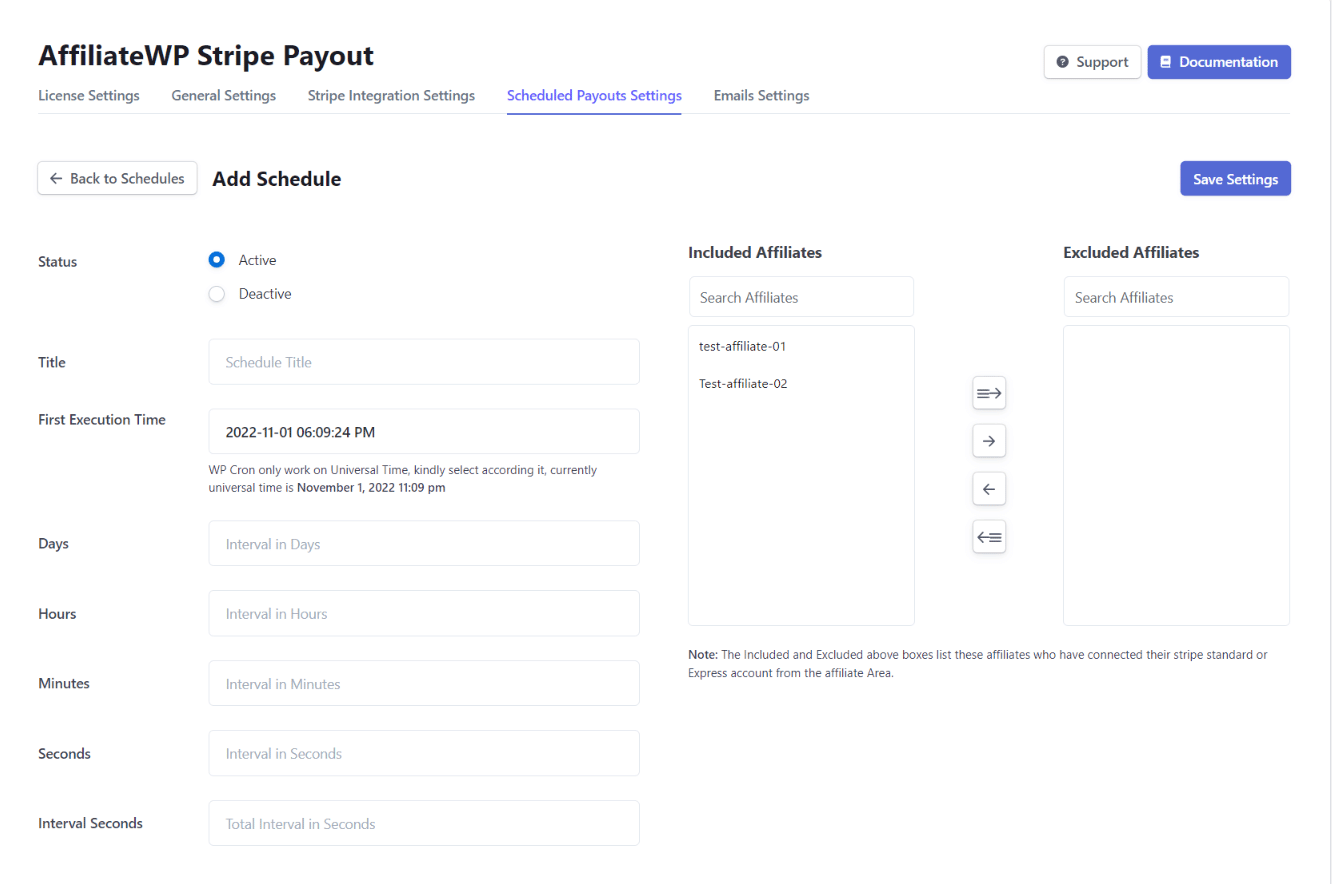
2- Fill the rest of the fields as desired, including the affiliates.
3- Click Save settings.
4- The saved schedule will appear on the Scheduled Payouts page.
Note: The Active schedules will only be executed, and you can set the first execution time later if you do not want them to be executed at the time of creation.

Schedule Actions
Hovering over the schedule will present you with standard WP options i.e
- Edit – It Lets you edit the schedule
- Execute – This lets you execute the flow.
- Delete – This lets you delete the created schedule.

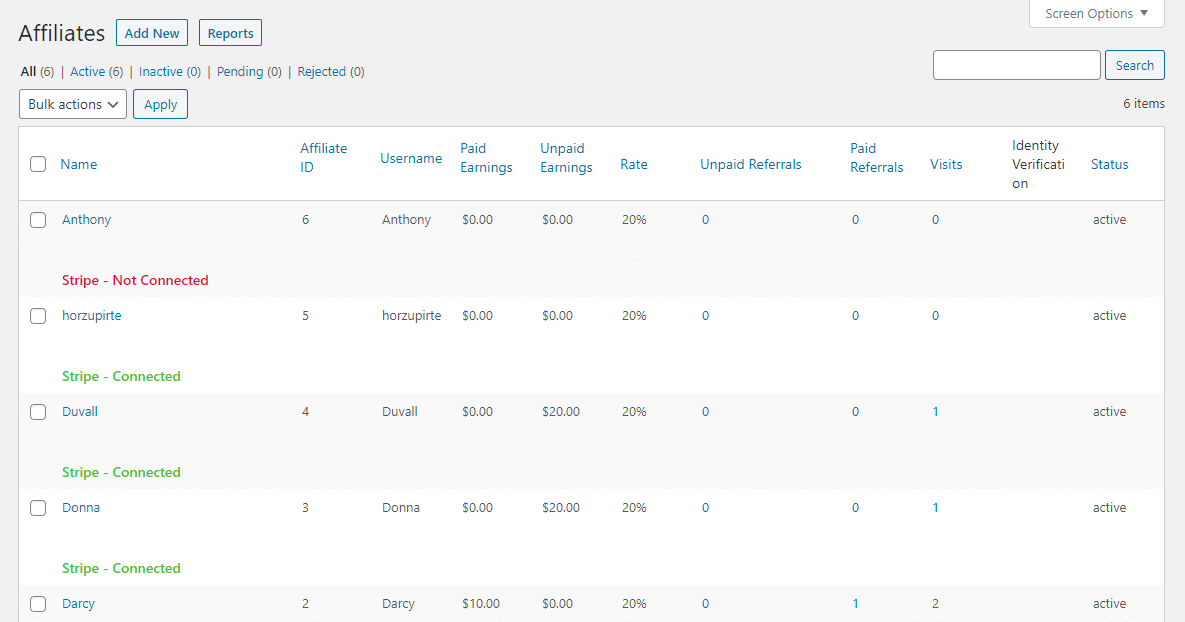
Affiliates’ connection status:
Navigate to Affiliates > Affiliates, the Stripe’s account connection status will be visible with the Affiliate’s name.
Manual Payout for Affiliates Individually and in Bulk
Upon the affiliates’ successful referrals, navigate to the Affiliates > Referrals from the WP dashboard.
Stripe Individual Referral Payout
There will be an action link to Stripe Payout in front of a successful unpaid referral, which depends upon three conditions:
1- The affiliate status should be active.
2- The affiliate’s Stripe account should be connected with the admin’s account.
3- The referral must be unpaid.

Note: The affiliate will receive the Stripe transfer and will be notified by email and after Stripe processing of the specified days, Stripe will create a payout and this plugin will notify the affiliate by email.
Stripe Bulk Referrals Payout
If you want to pay multiple referrals manually in bulk, you can select the unpaid referrals and then select “Stripe Bulk Payouts” from the bulk action dropdown.

Email Settings
This tab contains the available setting options for emails. The plugin provides the ability to send email notifications on the following events:
ADMIN NOTIFICATIONS
- Affiliate’s Stripe Connected
- Affiliate’s Stripe Disconnected
- Transfer Failed
- Payout Failed
AFFILIATE NOTIFICATIONS
- Affiliate’s Stripe Connected
- Affiliate’s Stripe Disconnected
- Transfer Created
- Transfer Failed
- Payout Paid
- Payout Failed
The email notification templates can be designed by the classic editor with the shortcodes. There is a shortcode section for every email template that has all the required shortcodes.


Affiliate’s Stripe Disconnected Email
If you connected an Existing Standard Stripe Account, then the “Affiliate Stripe Disconnected Email” will be triggered only upon its revocation.
How to Disconnect Stripe Account
To disconnect your Stripe account from a connected third-party platform, navigate to Settings > Team and security > Installed apps tab of your Dashboard and follow these steps;
Click on the Revoke button

A confirmation popup will appear. Click on the “Revoke” button.
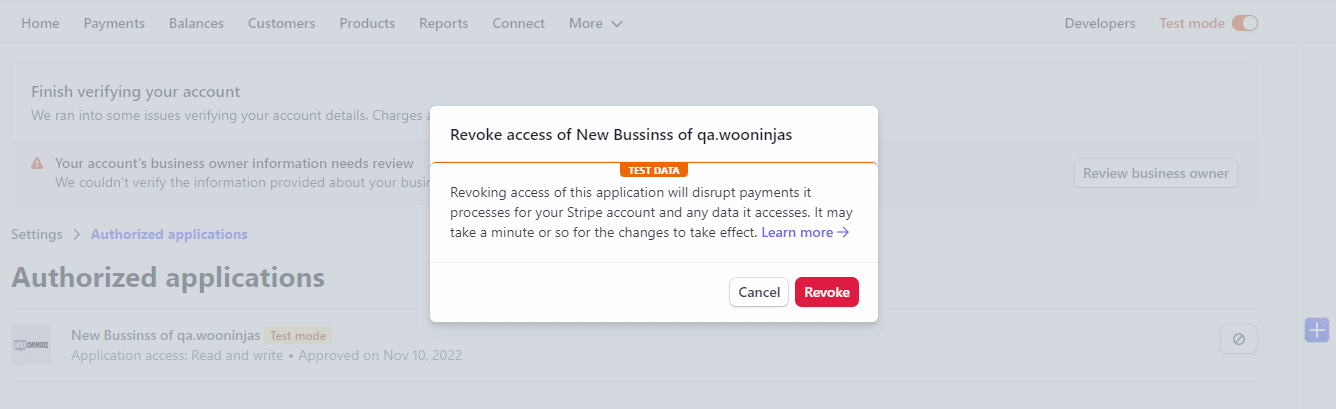
Finally, your account has been disconnected.

Stripe Connect Options on the Affiliate Area:
The affiliate area will display a “Stripe Payouts” Tab when the admin completes the connect settings. The affiliate will be able to connect the allowed types of Stripe accounts by processing the Stripe official onboarding connection form.
NOTE: The “Stripe Payouts” area will only appear if “Stripe account ID”, “Publishable key”, “Secret key”, “client ID”, account and application webhook “Signing secret” are set in “Stripe Integration Settings”.

Stripe Standard Account connection process:
The attached video explains the process when an affiliate wants to connect their standard account with the admin Stripe account
Demo Videos:
Affiliate have personal Stripe Standard accounts.
Stripe Express Account connection process:
The attached video explains the process when an affiliate wants to connect the Express account with the admin Stripe account and the Express account is the platform-dependent account; therefore, the affiliate will only be able to log in from the affiliate area “Stripe Payouts” tab login button.
Demo Videos:
Affiliates want to create and connect an express account.
Multisite Compatibility
If you are planning to install and use the add-on on a multisite, then kindly keep the following points in mind, as the add-on’s workflow is slightly restricted/modified as compared to installing and using it on a simple WordPress site where both users and affiliates exist in the same site’s database, whereas in a WordPress multisite, the users and the affiliates can exist in 2 or more different sites separately.
1- Add the following line to your wp-config.php file, preferably above the line /* That’s all, stop editing! Happy blogging. */:
define( ‘AFFILIATE_WP_NETWORK_WIDE’, true );
If you face an issue logging into any multisite site, try adding the following line as well after it to see if it resolves the problem (optional):
define(‘COOKIE_DOMAIN’, $_SERVER[‘HTTP_HOST’] );
2. Navigate to the “Settings” sub-menu in its “Integration” tab and make sure the respective integrations like WooCommerce (if you are using this plugin on your multisite) are selected on all the respective sites being used (including the main site).
3. Navigate to the “Settings” sub-menu in its “Advanced” tab and make sure the “Cookie Sharing” option is checked on all the respective sites being used (including the main site).
4. The administrator can only configure the add-on’s settings in the main site only because the “Stripe Payout Settings” sub-menu will only be visible on the main site. Also, the administrator can only pay the affiliates using the “Stripe Payout” option in the Referrals sub-menu on the main site only as well.
5. Similarly, the affiliate user’s account should be created on the main site only. This is because the “Stripe Payouts” tab in the “Affiliate Area” will only be visible to the affiliates on the main site. Also, the shortcode [awp_stripe_payout] will only work on the main site as well. In short, the affiliates can only connect their respective Stripe accounts on the main site.
6. The WooCommerce products or the users’ accounts can be created on any multisite site (it does not matter if it is the main site or not).
FAQ’s
I can only connect Stripe Express accounts on the front end. How can I connect both Stripe Express and Stripe Standard accounts on the front end?
The OAuth settings on the Stripe account determine the account connection options. Be sure to double-check the OAuth settings by navigating to Settings > Connect (Settings) from your Stripe Account. Select both account types if you want to have both options displayed on the front end.
Where can I find the Publishable and Secret keys?
Log in to your Stripe Account and navigate to Developers > API keys from the left side menu. There you will find the Publishable Key and Secret Key located under Standard Keys.
How can I configure the Redirect URL after an affiliate account is successfully connected with the admin account?
Log in to your Stripe Account and navigate to Settings > Connect (Settings). There will be a section of Redirects just below the OAuth settings. Here, you can add the URLs you want to redirect the user to after their account is successfully connected to the admin account. Do not forget to set this redirect URI as “default”.
Where can admins see the list of affiliates connected to their accounts?
Log in to your Stripe account from the left side menu and select “ Connected Accounts.” You will find a list of all connected accounts here.
Does this add-on support cross-region payments? Like, I am in the United States of America and want to pay an affiliate who is living in the United Kingdom?
Yes, the addon’s current version does support cross-region payment.
Can I use a different currency in the Stripe account and AffiliateWP settings?
No, the addon will only perform the payments using the Stripe account’s currency. Please make sure your AffiliateWP currency is the same as your Stripe account currency.
Can the admin integrate a Stripe account that is using an old version of the Stripe API?
Yes, this addon will be compatible with your Stripe even if you are using an old version of the Stripe APIs.
Is there any fee involved to make payouts?
No, there is no additional fee other than Stripe transactional fees/charges.
Is an affiliate required to have a Stripe account to use your service?
An affiliate doesn’t need to have an existing Stripe standard account. Our addon allows your affiliate to create and connect their Stripe Express account, which will be controlled from your Stripe dashboard. The only requirement is that your affiliate should be in a country where the stripe is officially operating.
How to use the add-on with the Affiliate Portal add-on?
Please note that Affiliate Portal is an add-on to the AffiliateWP plugin, and at this time, there isn’t a hook available in the Affiliate Portal add-on to add a custom tab in the affiliate area for AffiliateWP third-party add-ons.
AffiliateWP Stripe Payout add-on adds its custom tab in the affiliate area using the hook provided by AffiliateWP, but as there isn’t any hook in the Affiliate Portal add-on, we can’t add such a tab on its portal page. Therefore, we have created a shortcode that you can add to any page on your website. You can then link that page on your website, and your affiliates can access the Stripe Payout add-on content through that link.
Why do affiliates experience an error when attempting to connect, with the message “No application matches the supplied client identifier”?
To resolve this issue, carefully review your client ID within the “Stripe Integration Settings.” Verify its accuracy and pay close attention to the presence of any leading or trailing blank spaces.
Why are affiliates not redirecting to the Stripe Onboarding page after clicking on connect to standard or express Stripe account button?
The reason affiliates may not be redirecting to the Stripe Onboarding page after clicking on the “Connect to Standard Stripe Account” or “Connect to Express Stripe Account” button could be due to incomplete settings. Ensure a smooth redirection by navigating to Settings > Connect (Settings) within your Stripe Account. Confirm that you have provided accurate business branding and other essential details.
Why is the “Stripe Payouts” tab not appearing in the Affiliate Area?
The “Stripe Payouts” area will only appear if “Stripe account ID”, “Publishable key”, “Secret key”, “client ID”, account and application webhook “Signing secret” are set in “Stripe Integration Settings”.
Which type of Stripe account should affiliates connect to receive their payments?
To receive their payments via Stripe, affiliates need to connect either a Stripe Standard or Stripe Express account to your platform. The AffiliateWP Stripe Payout Integration supports both account types, and you can choose to allow one or both during setup.
Affiliates can connect their account through the “Stripe Payouts” tab in their Affiliate Area on your site. This tab appears after you configure the Stripe Connect settings from your WordPress dashboard by going to: Affiliates > Stripe Payout Settings > Stripe Integration Settings > Connect Settings
From there:
- You can choose to allow Standard Accounts, Express Accounts, or let affiliates choose.
- Affiliates will go through Stripe’s secure onboarding process to connect their account.
Once connected, they can receive both manual and scheduled payouts directly from your Stripe account.
Why are my scheduled payouts (e.g., on the 15th of the month) not processing automatically?
If you’re encountering payout issues due to an insufficient balance, we recommend turning off Auto Payout and enabling Manual Payouts in your Stripe settings. By default, Stripe uses daily automatic payouts, which means any available funds are immediately sent to your bank account. However, if you’d prefer to use an available balance so that you can issue payouts to other connected Stripe accounts, you’ll need to switch your account to Manual Payouts.
Why does Stripe show $2.00 as “200” in the logs and emails? Is this a payment error?
The difference you’re observing is due to how Stripe handles monetary values. On the website and in the email, amounts are displayed in dollars (e.g., $2.00). However, in Stripe’s API and logs, amounts are represented in the smallest currency unit – in this case, cents for USD. For example:
- $2.00 is equivalent to 200 cents.
- In Stripe logs, “amount”: “200”, “currency”: “usd” represents $2.00 USD.
This is standard for Stripe’s system to ensure consistency across all currencies. Rest assured, the amount is correct, and no discrepancy exists. It’s just a matter of how Stripe formats amounts internally.
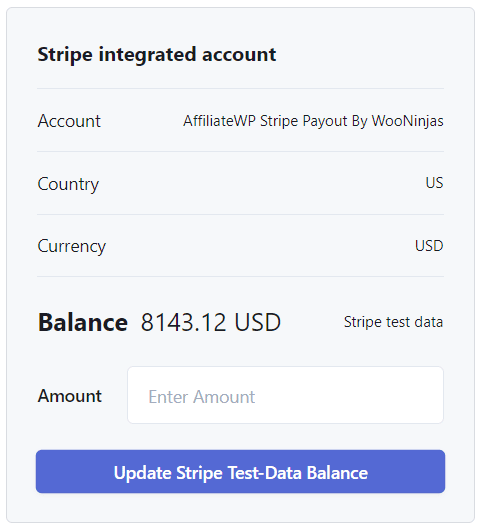
Does the Payout Scheduling feature work in Stripe Test Mode, and why are some affiliates not showing in the Included Affiliates list?
The Payout Scheduling feature works in Test Mode. The reason you’re not seeing the username in the “Included Affiliates” box is that only users who have connected to their Stripe account using the plugin’s front-end functionality will appear there. Once the Stripe account is connected, the user will show up in the list of Included Affiliates for payout schedules.
Changelogs
1.4.11
- New: Addressed security vulnerabilities and improved overall plugin security.
1.4.10
- Fix: Fixed minor UI issues.
1.4.9
- New: Added a “Cross-Border” status column to the referrals listing table for quick regional verification.
1.4.8
- New: Added cross-border payout functionality.
- Fix: Updated the UI for alert pop-ups.
1.4.7
- New: Added compatibility with WordPress Multisite.
1.4.6
- Fix: Email trigger after Stripe account is successfully connected.
- Fix: Update test account email shortcodes to display “Test User” instead.
1.4.5
- Fix: Handle stripe payouts tab buffer in multiple calls.
- Fix: Fix the UI issue in the affiliate area.
1.4.4
- Fix: First execution time while editing.
- Fix: Next execution time conflicts with interval.
- Fix: Removing schedules on plugin deactivation.
1.4.3
- Fix: Zero decimal and decimal currency values.
- Fix: Removed Stylesheet conflict with themes.
1.4.2
- Fix: Use API for express accounts instead of OAuth.
- Fix: Frontend Scripts loading.
1.4.1
- Fix: Fatal error on OAuth redirect URL.
- Fix: Warnings on Stripe payouts page.
1.3.0
- New: The UI has been updated.
- New: The new Webhook manager will update the Stripe Webhooks on every new update of the addon.
- Fix: The PHP 8 compatibility issues have been fixed.
1.2.0
- New: File-based system log.
- Fix: Only connected accounts with a complete profile can be paid.
- Fix: Added detailed stripe messages on admin side affiliates listing and affiliate area shortcode.
- Fix: Updates on the admin side manual payout option.
- Fix: Stripe return link to the website.
- Fix: UI issue on the General Setting page.
- Fix: Code tweaks.
1.1.2
- New: The multilingual support added to the add-on.
- New: The timestamp additional parameter is added to license API requests.
- Fix: The Stripe API Version auto conversion issue.
- Fix: The cron-job failer issue in case of insufficient balance for scheduled payout.
1.1.1
- Fix: The activation & deactivation issue.
- Fix: The admin settings test-mode & live-mode switching issues.
- Fix: The Stripe API version issue, so now is working on API old version using stripe accounts.
- Fix: The amount multiplication by 100 regarding the Zero-decimal currencies.
- Fix: The admin default currency selection issue.
1.1.0
- New: The Affiliate Stripe’s connection status is added under the affiliates listing “Name” column.
- New: “Emails Notifications” templates with new useful shortcodes.
- Fix: The Stripe connect standard account onboarding issues regarding Stripe SDK v7.72.0.
- Fix: The Stripe connect express account onboarding issues regarding Stripe SDK v7.72.0.
- Fix: The not connected affiliate’s referral ‘stripe payout’ link visibility issue.
- Fix: The auto-execution issues of scheduled referrals payments.
- Fix: The UI issues and typos.
