Set a schedule for all of your courses, lessons, topics, and quizzes, and keep track of these scheduled events from the add-on’s calendar. By displaying custom messages, informing students of course content available, and using the add-on widget, you can easily keep your students in the loop about upcoming events.
Control the visibility of your courses by choosing when content is available and which users or user roles will be able to access it.
Video Tutorial
Watch the tutorial video below for a quick walkthrough of the add-on’s features and setup process.
For detailed instructions, please continue reading the full documentation. If you still have any questions, feel free to submit a support ticket.
Installation
- Install the LearnDash plugin and activate it.
- Install the LearnDash Course Planner Pro add-on and activate it.
- Once active, the LearnDash Course Planner Pro menu will appear on your WordPress dashboard.
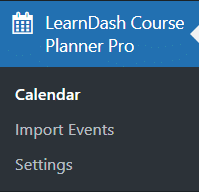
Settings
To configure the LearnDash Course Planer Pro System’s settings, navigate to LearnDash Course Planer Pro from the WordPress dashboard and select the Settings option.
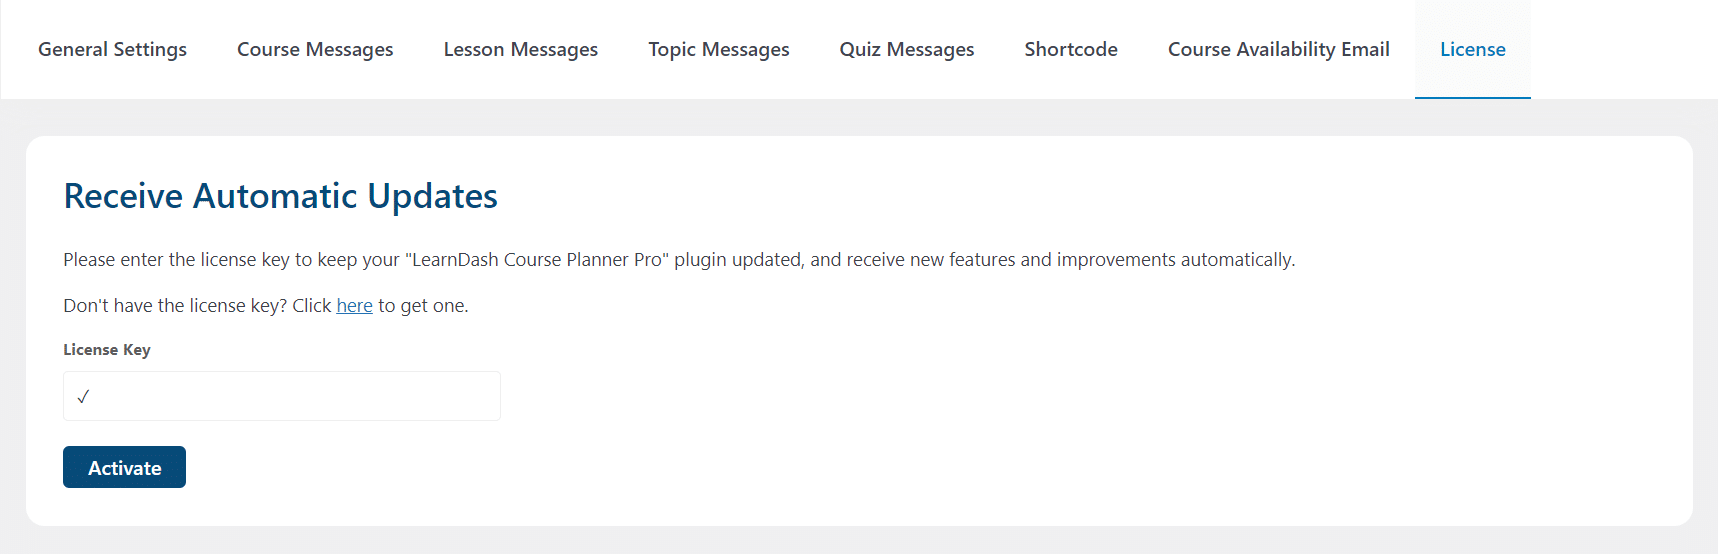
License
To insert your product license key, you must navigate to the License tab located in the Settings section of the LearnDash Course Planner Pro add-on. By entering a valid license key for this product, the user will get automatic product updates.
General Settings
General Settings are located on the first tab of the Settings page. Here, you can select the scheduling option you prefer to use on the add-on and calendar.

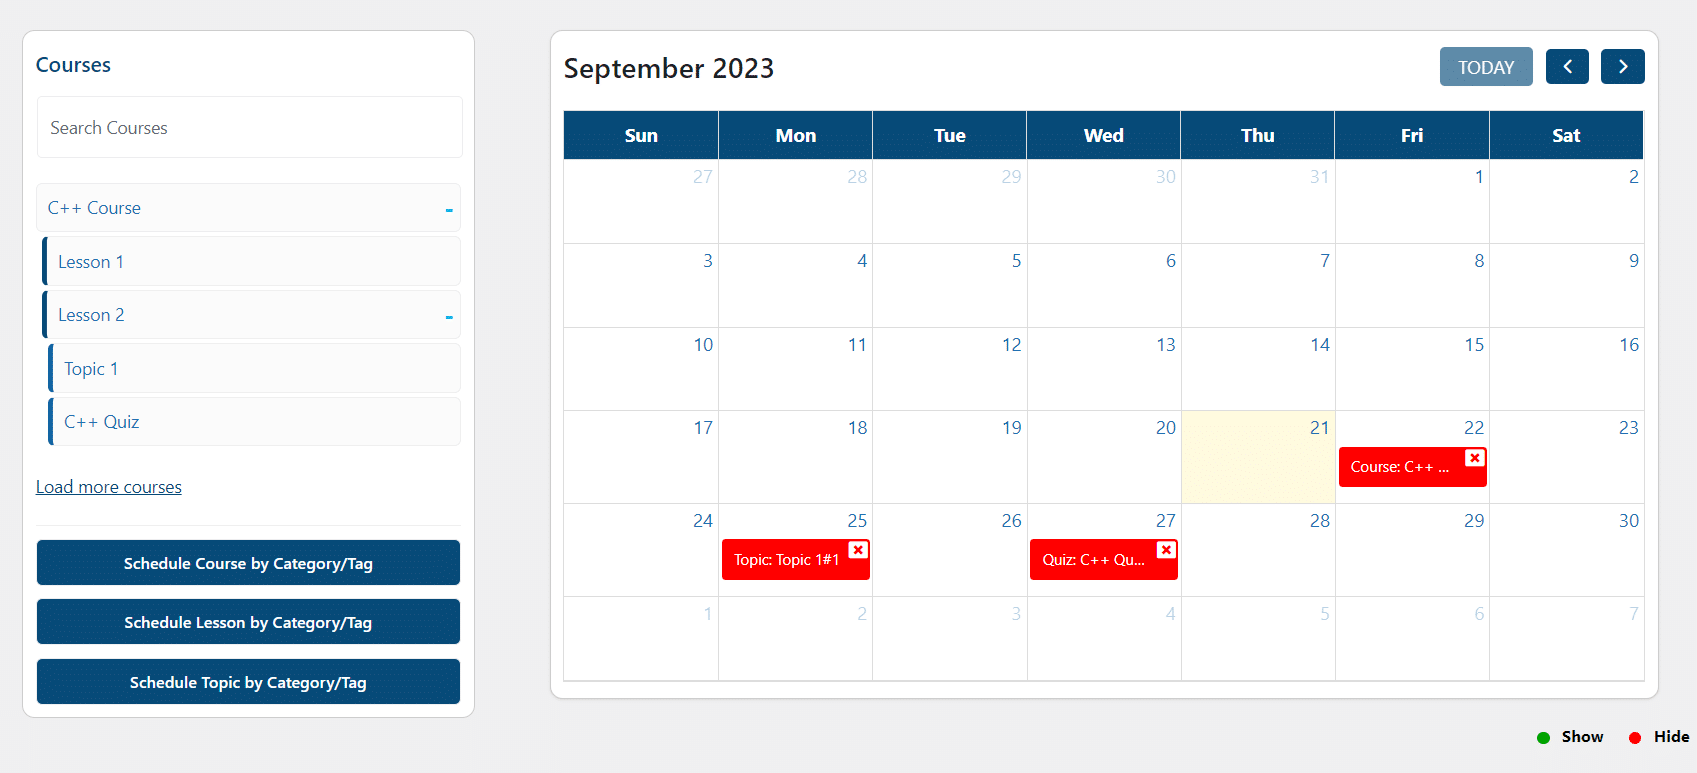
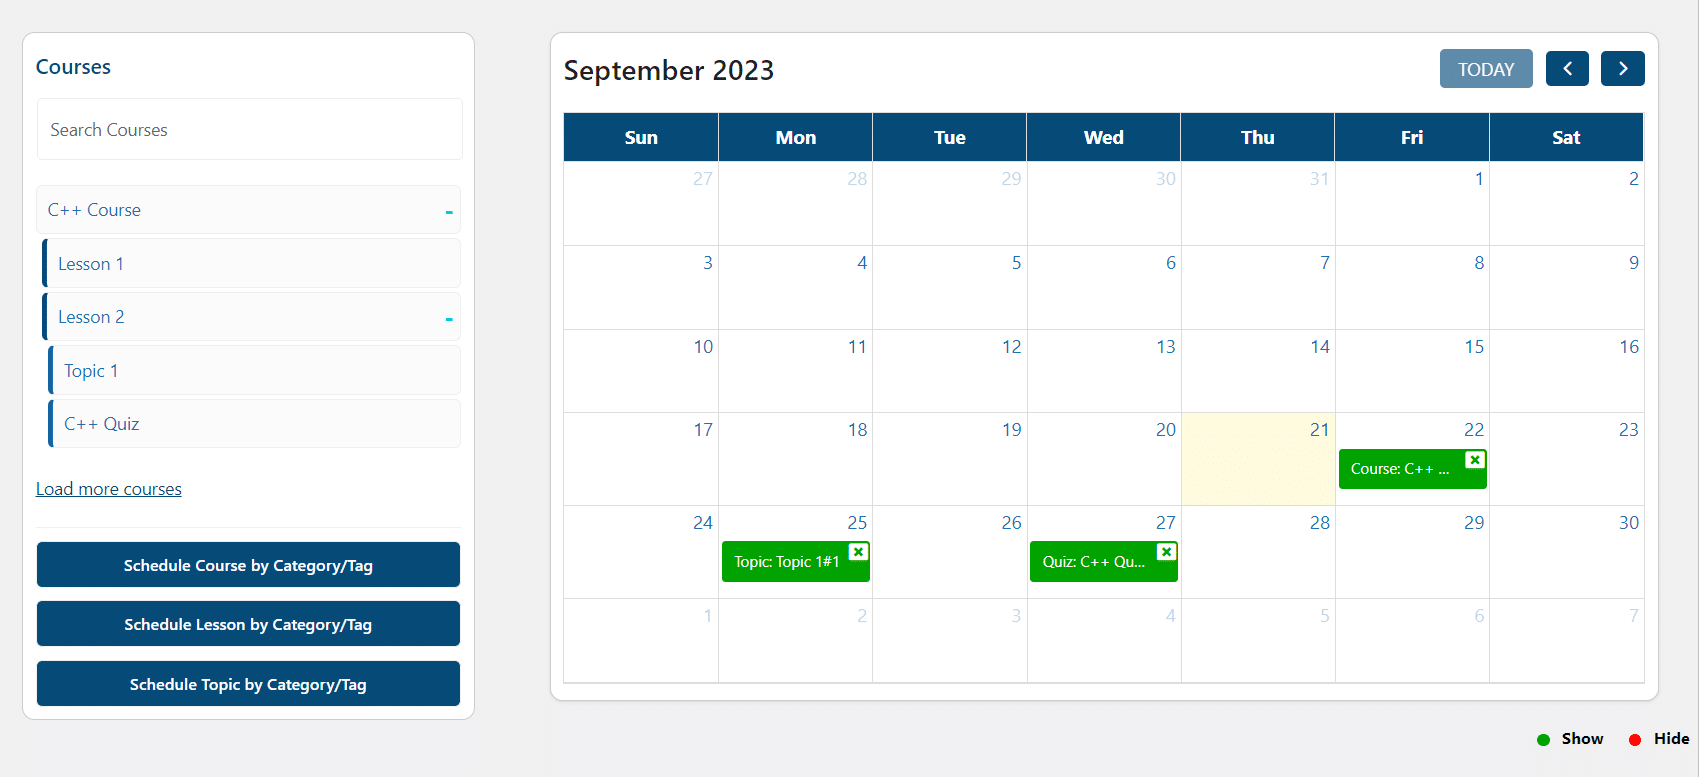
- Show Courses, Lessons, Topics, and Quizzes on Specified Dates:
This option allows the admin to schedule content, showing courses, lessons, topics, and quizzes only on set dates on the calendar.
- Hide Courses, Lessons, Topics, and Quizzes on Specified Dates:
This option allows the admin to schedule content by deciding when to hide the courses, lessons, topics, and quizzes, making them unavailable during certain set dates on the calendar.
- Hidden for All Users:
This option allows you to hide all courses, lessons, topics, and quizzes content to users who do not fall in the allowed user list.
- Send Course Availability Email:
With this setting enabled, a course availability notification email will be sent to students enrolled in a course when the course becomes available according to the schedule.
- Hide Unavailable Courses:
Enable this option if you want to hide the unavailable courses from the course listing pages.
- Allow Group Leaders/Instructors to edit restriction messages:
If enabled, Group Leaders and Instructors can access the Message tabs and set custom messages for their groups.
- Allow selected user roles to manage their courses only:
If the option is selected then selected roles can manage their own courses otherwise can manage all of the group courses.
- Allow user roles to schedule courses
Selected user roles can schedule the courses from the frontend.
- Exclude user roles from scheduling:
Here you can select the user roles that you want to exclude from scheduling, i.e., they will be able to view all of the unavailable courses.
Course Messages
From the Course Messages tab, the admin can create custom messages to display for scheduled courses. Three types of messages can be displayed according to the course’s schedule:

- Message to display when the“Show courses, lessons, topics or quizzes on specified dates” setting is enabled”:
In this section, you can add and edit the message that will be shown when a user visits the course page and that course has been scheduled for a later date by enabling the first setting option in the general settings. You can also use the following shortcodes to showcase the scheduled dates in the message:
- [cs_scheduled_dates] > This will showcase both the start and end scheduled dates in the message.
- [cs_scheduled_dates_start_only] > This will showcase only the start scheduled date in the message.
- [cs_scheduled_dates_end_only] > This will showcase only the end scheduled date in the message.
- Message to display when the “Hide courses, lessons, topics or quizzes on the specified dates” setting is enabled”:
The message in this field will be displayed when a user visits the course page, and that course has been scheduled to be hidden during the dates set on the calendar. To set the dates in which content will be hidden, you must first enable the second setting option in the general settings. You can also use the following shortcodes to showcase the scheduled dates in the message:
- [cs_scheduled_dates] > This will showcase both the start and end scheduled dates in the message.
- [cs_scheduled_dates_start_only] > This will showcase only the start scheduled date in the message.
- [cs_scheduled_dates_end_only] > This will showcase only the end scheduled date in the message.
- Message to display when the “Hidden for All Users” setting is enabled:
The message added in this section will be displayed to users when they aren’t allowed to visit a course page due to the “Hidden for All Users” setting.
Lesson Messages
From the Lesson Messages tab, the admin can create custom messages to display on lesson Pages for the scheduled Lessons according to the schedule settings. Four types of messages can be displayed on lesson pages:

- Message to display when the “Show courses, lessons, topics or quizzes on specified dates” setting is enabled:
In this field, you can set the message that will be shown when a user visits a lesson page and that lesson has been scheduled for a later date. Lesson dates can be scheduled when the first setting option is enabled in the general settings. You can also use the following shortcodes to showcase the scheduled dates in the message:
- [cs_scheduled_dates] > This will showcase both the start and end scheduled dates in the message.
- [cs_scheduled_dates_start_only] > This will showcase only the start scheduled date in the message.
- [cs_scheduled_dates_end_only] > This will showcase only the end scheduled date in the message.
- Message to display when the “Hide courses, lessons, topics or quizzes on the specified dates” setting is enabled:
This message will be shown when a user visits the lesson page and that lesson is scheduled to be hidden during the dates set on the calendar (with the second setting option being selected in the general settings). You can also use the following shortcodes to showcase the scheduled dates in the message:
- [cs_scheduled_dates] > This will showcase both the start and end scheduled dates in the message.
- [cs_scheduled_dates_start_only] > This will showcase only the start scheduled date in the message.
- [cs_scheduled_dates_end_only] > This will showcase only the end scheduled date in the message.
- Message to display when the “Hidden for All Users” setting is enabled:
The message added to this text box will be displayed when a user is not allowed to visit a lesson page when the “Hidden for All Users” setting is enabled.
- Message when “lesson parent course is hidden” setting is enabled:
The message written in this field will be shown when the lesson’s parent course is hidden from the user due to the “Hidden From All Users” setting being enabled.
Topic Messages
From the Topic Messages tab, the admin can create custom messages to display for the scheduled topics. Three types of messages can be displayed for scheduled topics:

- Message to display when the “Show courses, lessons, topics or quizzes on specified dates” setting is enabled:
This message added in this text field will be shown when a user visits a topic page and that topic has been scheduled for a later date. Courses and their content can be scheduled to be available during certain dates when the first setting option is enabled in the general settings. You can also use the following shortcodes to showcase the scheduled dates in the message:
- [cs_scheduled_dates] > This will showcase both the start and end scheduled dates in the message.
- [cs_scheduled_dates_start_only] > This will showcase only the start scheduled date in the message.
- [cs_scheduled_dates_end_only] > This will showcase only the end scheduled date in the message.
- Message to display when the “Hide courses, lessons, topics or quizzes on the specified dates” setting is enabled:
The message in this field will be displayed when a user visits a topic page, and that topic has been scheduled to be hidden during the dates set using the “Hide courses, lessons, topics, or quizzes on the specified dates” are enabled on the General Settings. You can also use the following shortcodes to showcase the scheduled dates in the message:
- [cs_scheduled_dates] > This will showcase both the start and end scheduled dates in the message.
- [cs_scheduled_dates_start_only] > This will showcase only the start scheduled date in the message.
- [cs_scheduled_dates_end_only] > This will showcase only the end scheduled date in the message.
- Message to display when the “Hidden for All Users” meta setting is enabled:
This message will be displayed when a user is not allowed to visit a topic page when the “Hidden for All Users” setting is enabled.
- Message when “topic parent lesson is hidden” setting is enabled:
The message in this text box will be shown when a lesson page can’t be accessed because the parent lesson is hidden due to the enabling of the “Hidden for All Users” setting.
Quiz Messages
From the Quiz Messages tab, the admin can create custom messages to display for the scheduled quizzes. Three types of messages can be displayed for scheduled quizzes:

- Message to display when the “Show courses, lessons, topics or quizzes on specified dates” setting is enabled:
This message will be displayed when a user visits the quiz page and that quiz has been scheduled for a later date. Content visibility dates are set when the first setting option is enabled in the general settings. You can also use the following shortcodes to showcase the scheduled dates in the message:
- [cs_scheduled_dates] > This will showcase both the start and end scheduled dates in the message.
- [cs_scheduled_dates_start_only] > This will showcase only the start scheduled date in the message.
- [cs_scheduled_dates_end_only] > This will showcase only the end scheduled date in the message.
- Message to display when the”Hide courses, lessons, topics or quizzes on the specified dates” setting is enabled:
The message added to this text box will be displayed when a user visits a quiz page, and that quiz has been scheduled to be hidden during certain dates that are set on the calendar. Dates for hidden content can be scheduled using the add-on when the second setting option is enabled in the general settings. You can also use the following shortcodes to showcase the scheduled dates in the message:
- [cs_scheduled_dates] > This will showcase both the start and end scheduled dates in the message.
- [cs_scheduled_dates_start_only] > This will showcase only the start scheduled date in the message.
- [cs_scheduled_dates_end_only] > This will showcase only the end scheduled date in the message.
- Message to display when the “Hidden for All Users” setting is enabled:
This message will be displayed when a user visits a quiz page and is not allowed to visit that course page, and the “Hidden for All Users” setting is enabled.
- Message when “quiz parent is hidden” setting is enabled:
This message will be displayed when a user visits a quiz page and is not allowed to visit that course page, and the “Hidden for All Users” setting is enabled.
Shortcode
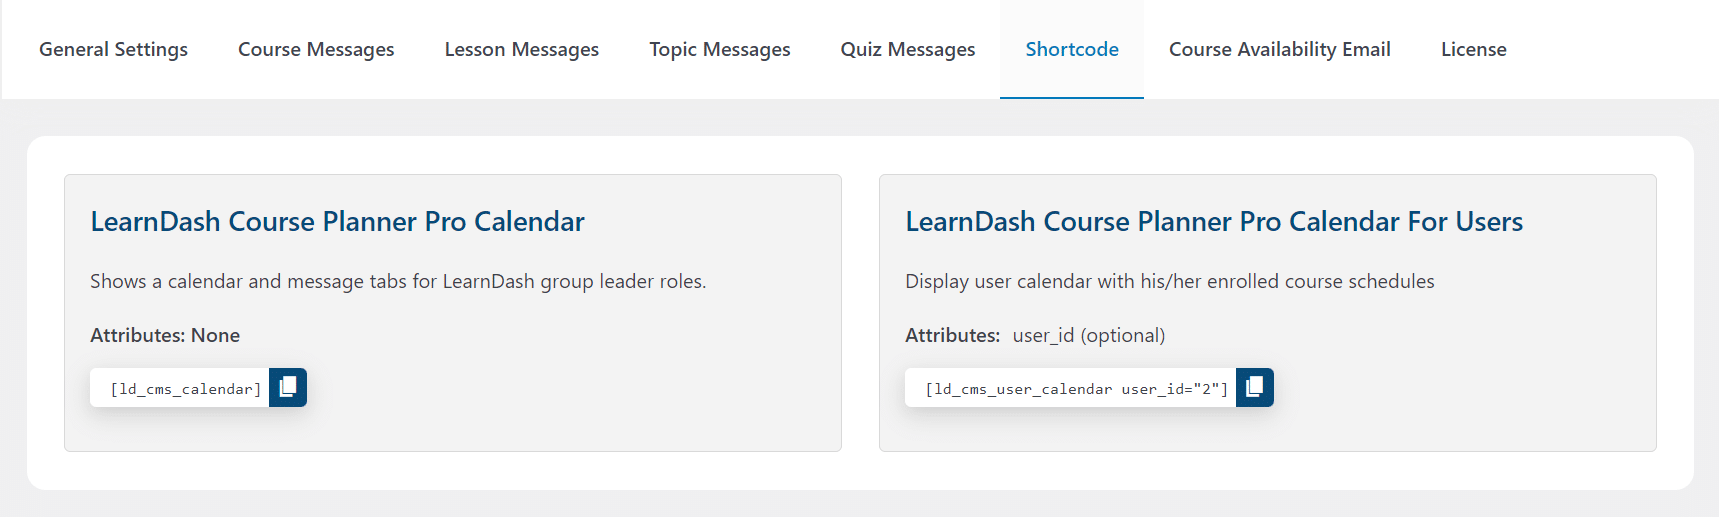
- Using the [ld_cms_calendar] shortcode, you can display the LearnDash Course Planner Pro calendar and message tabs on the frontend of any page. Administrators and LearnDash group leaders can schedule accessibility for courses, lessons, topics, and quizzes from this calendar. The front-end calendar also allows you to configure the different messages that inform students about the availability of the content.
- Using the [ld_cms_user_calendar] shortcode, you can display a calendar that shows your students’ scheduled courses on any page. This calendar will only show the scheduled courses in which the user is enrolled. You can use the shortcode’s “user_id” attribute if you only want to display a specific user’s calendar.
Eg. [ld_cms_user_calendar user_id=”2″]
Course availability email
From this tab, you can configure the email you want to send if a certain course becomes available for an enrollee.
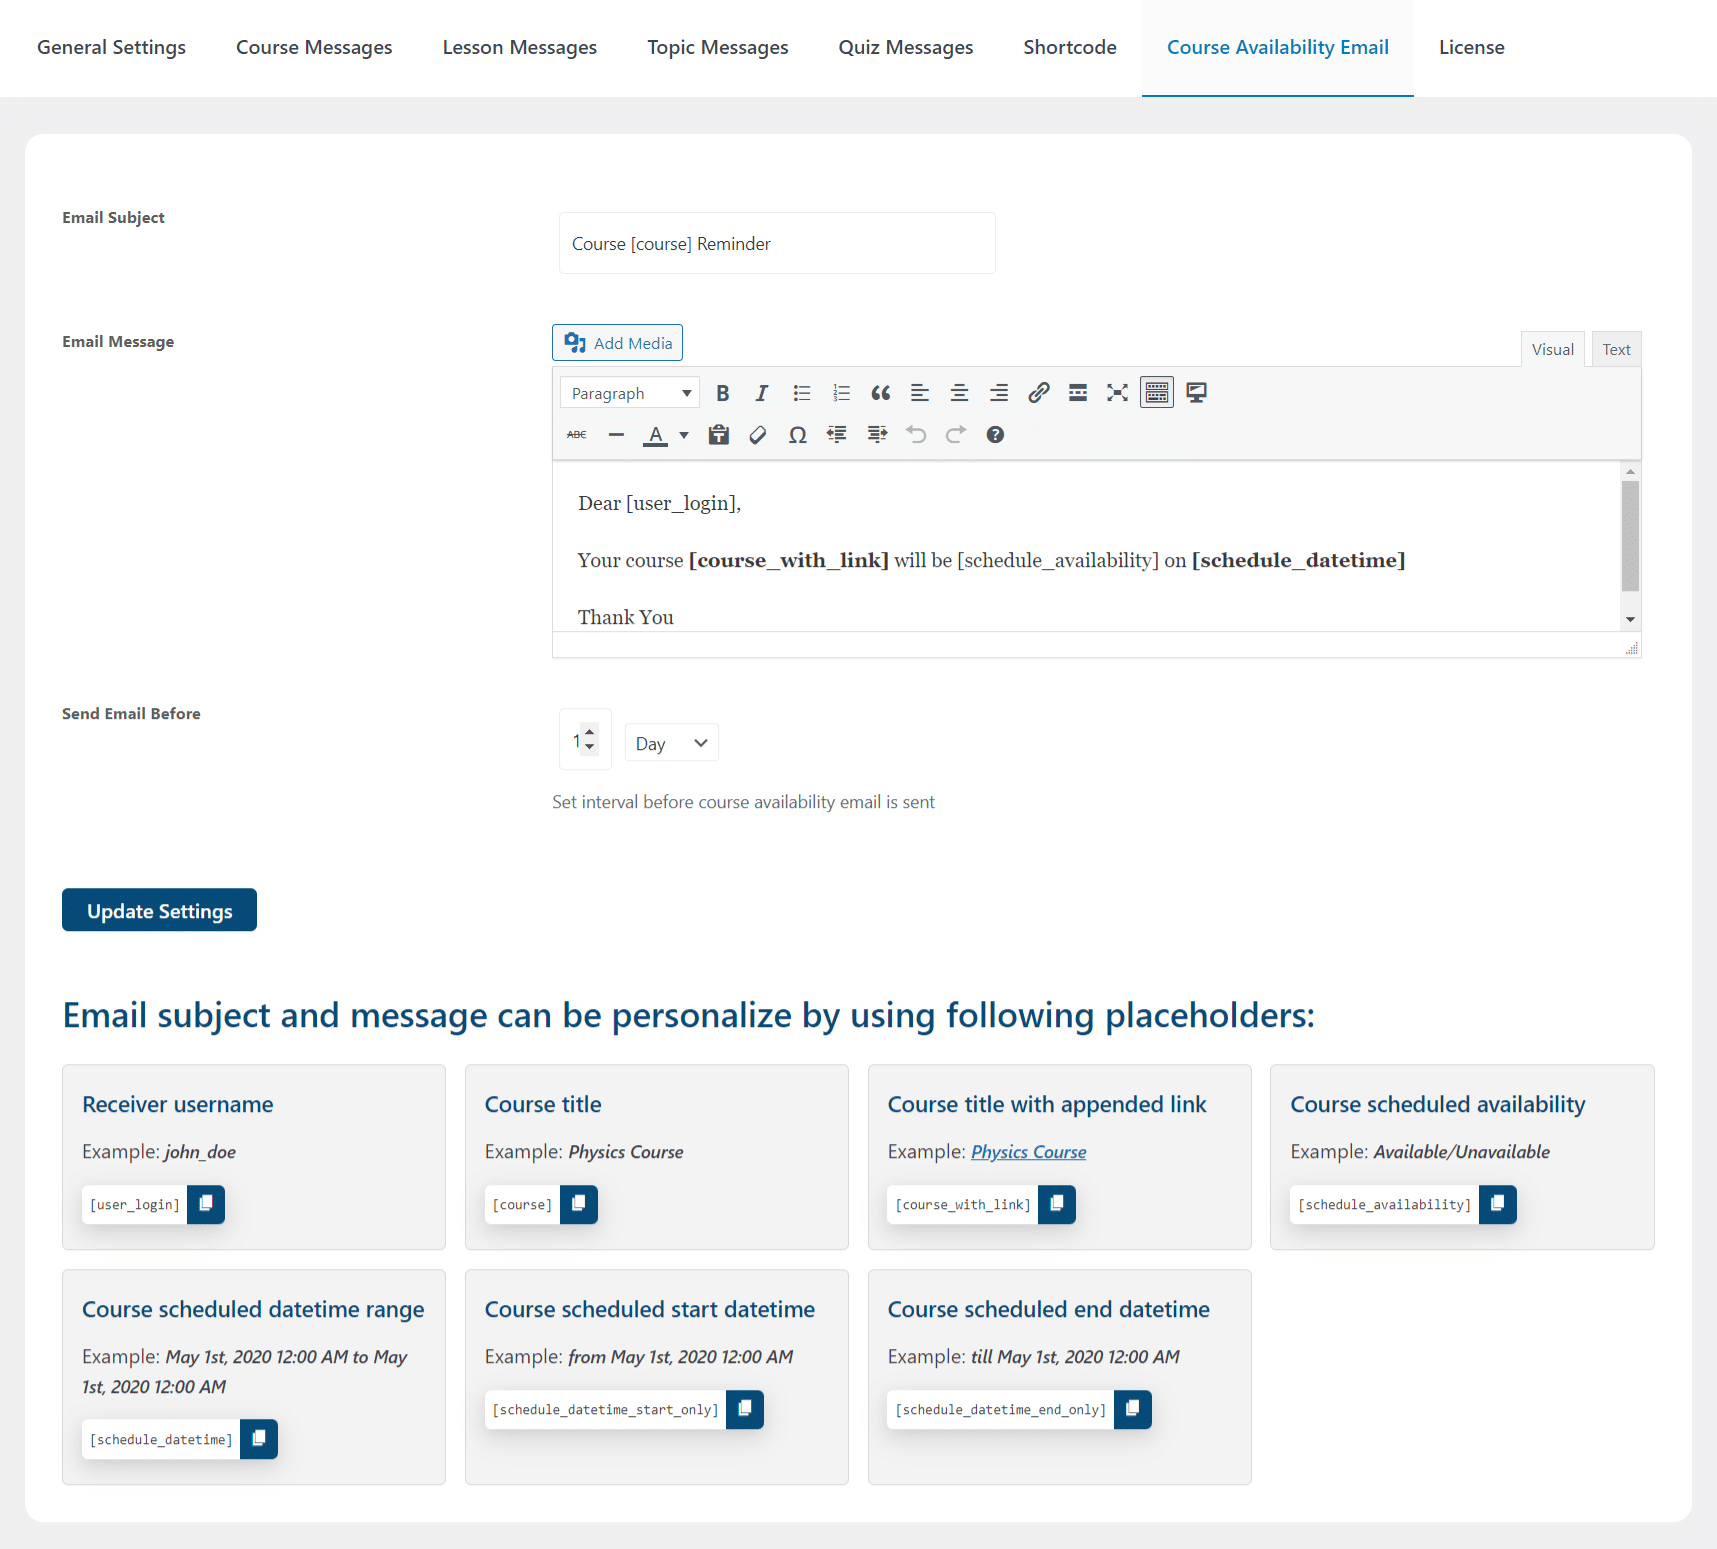
- Email Subject:
Enter the subject of the email.
- Email Message:
Enter the personalized email body with the help of the following placeholders.
[user_login]: Receiver username, example john_doe
[course]: Course title, example Physics Course
[course_with_link]: Course title with the appended link, for example, Physics Course
[schedule_availability]: Course scheduled availability, for example, Available/Unavailable
[schedule_datetime]: Course scheduled DateTime, example May 1st, 2020 12:00 AM
[schedule_datetime_start_only]: Course scheduled start datetime, for example, from May 1st, 2020 12:00 AM
[schedule_datetime_end_only]: Course scheduled end datetime, for example, till May 1st, 2020 12:00 AM
- Send Email Before:
Set the time interval before which the course availability email is sent.
Specific Course Availability Email
Similarly, the administrator can configure the course availability emails for specific courses as well from the respective course’s settings tab.
The steps are as follows:
1. Enable the “Enable Course Email Notifications” option toggle.
2. Add the subject line for course reminder email notifications in the “Email Subject” option. Here, the administrator can use the same placeholders provided in the “Course Availability Email” tab.
3. Add the message content for course reminder email notifications in the “Email Message” option. Here, the administrator can use the same placeholders provided in the “Course Availability Email” tab.
4. Set an interval time for course reminder email notifications in the “Send Email Before” option.
5. Set the interval unit for course reminder email notifications in the “Time Unit” option. The interval units provided are days, weeks, and months, respectively.

Note: Course availability emails set globally in the “Course Availability Email” tab or in any course’s settings tab will not be sent to the users who have completed the respective course(s).
Scheduling
Schedule Dates to Hide Content
This option allows the admin to hide course content, lessons, topics, and quizzes on the dates set on the calendar.
Follow these instructions to hide the content of courses, lessons, topics, and quizzes:
- From the admin dashboard, go to Learndash Course Planner Pro and select Settings.
- Enable the “Hide courses, lessons, topics, and quizzes on the specified dates” option in the General Settings tab and update the settings.
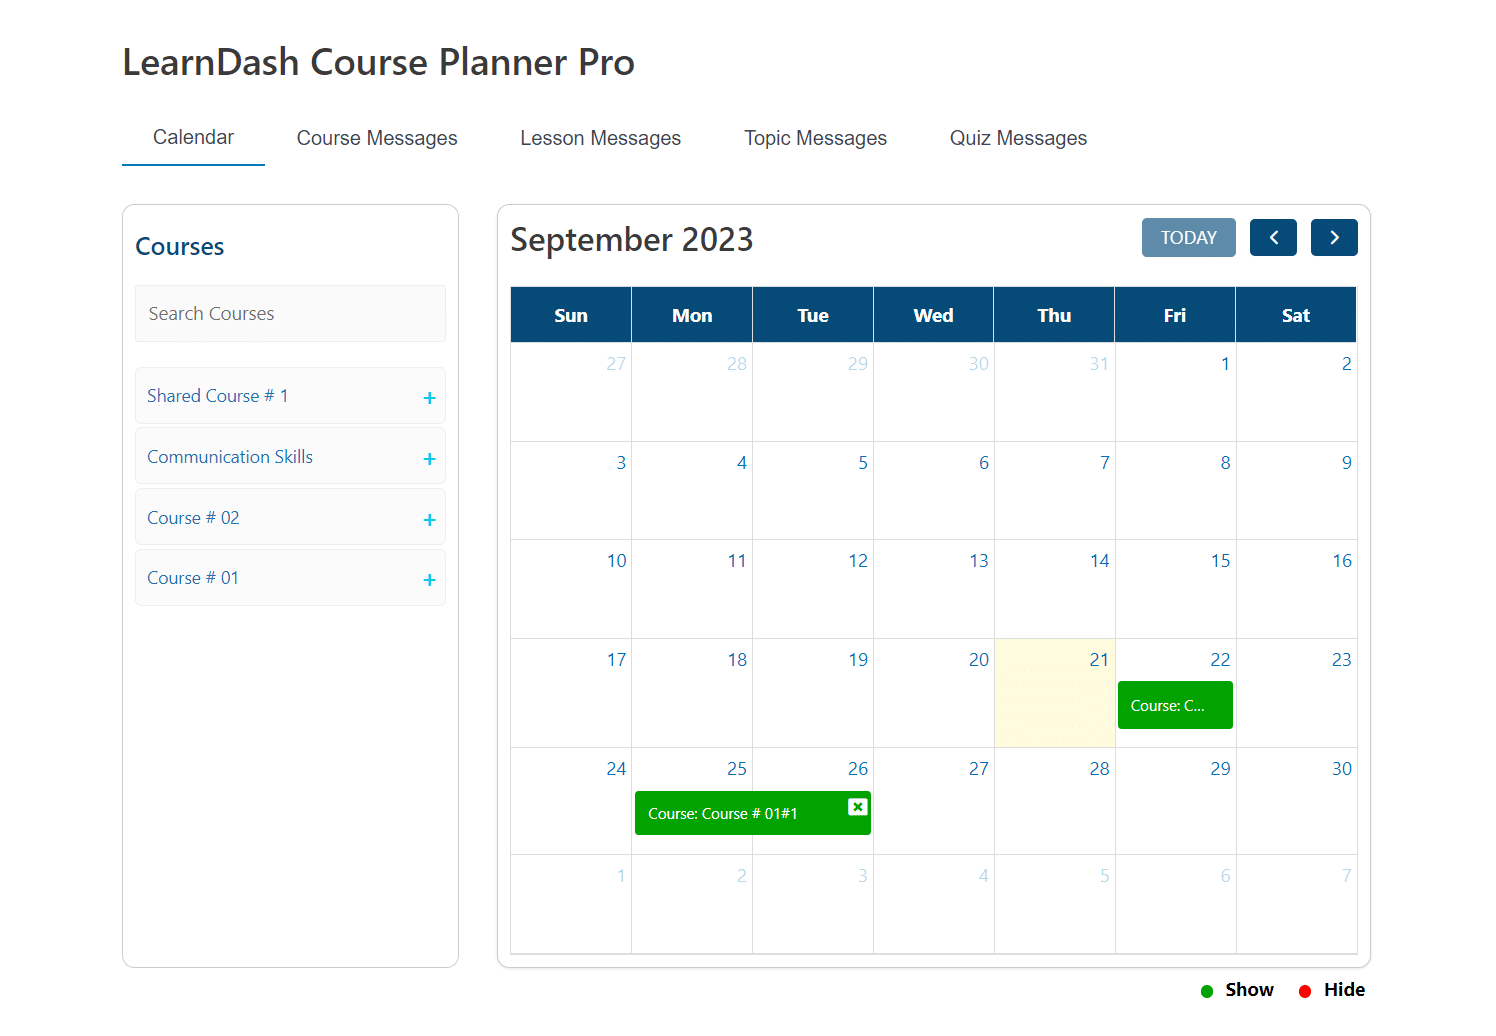
- Go to Calendar from the Learndash Course Planner Pro menu.
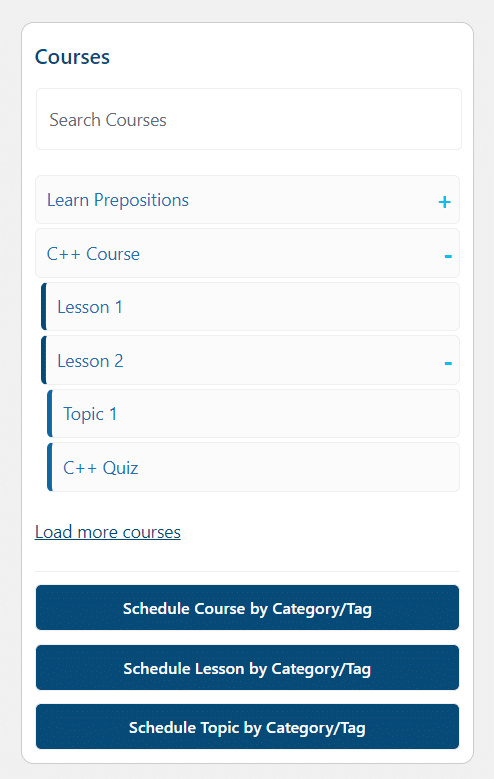
- On the right side, all created courses are listed. Click on the “+” sign next to any course to view the “Lessons” associated with that specific course. Similarly, to view the related “Topics” and “Quizzes” associated with the specific lesson, you have to click on the “+” sign next to each lesson.
- Select any course, lesson, topic, or quiz you want to hide on a specific date/dates and drag & drop that to the specific date on the calendar. Now, that specific course, lesson, topic, or quiz content will not be visible during the scheduled dates.
- For the rest of the dates, that specific course, lesson, topic, or quiz content will be visible to the users.
Schedule Dates to Show Content
This option allows the admin to display course content, lessons, topics, and quizzes on custom dates set on the calendar.
Follow these instructions to hide the content of courses, lessons, topics, and quizzes:
- From the WordPress dashboard, go to Learndash Course Planner Pro and select Settings.
- Enable the option “Show courses, lessons, topics, and quizzes on the specified dates” to schedule your content and update the settings.
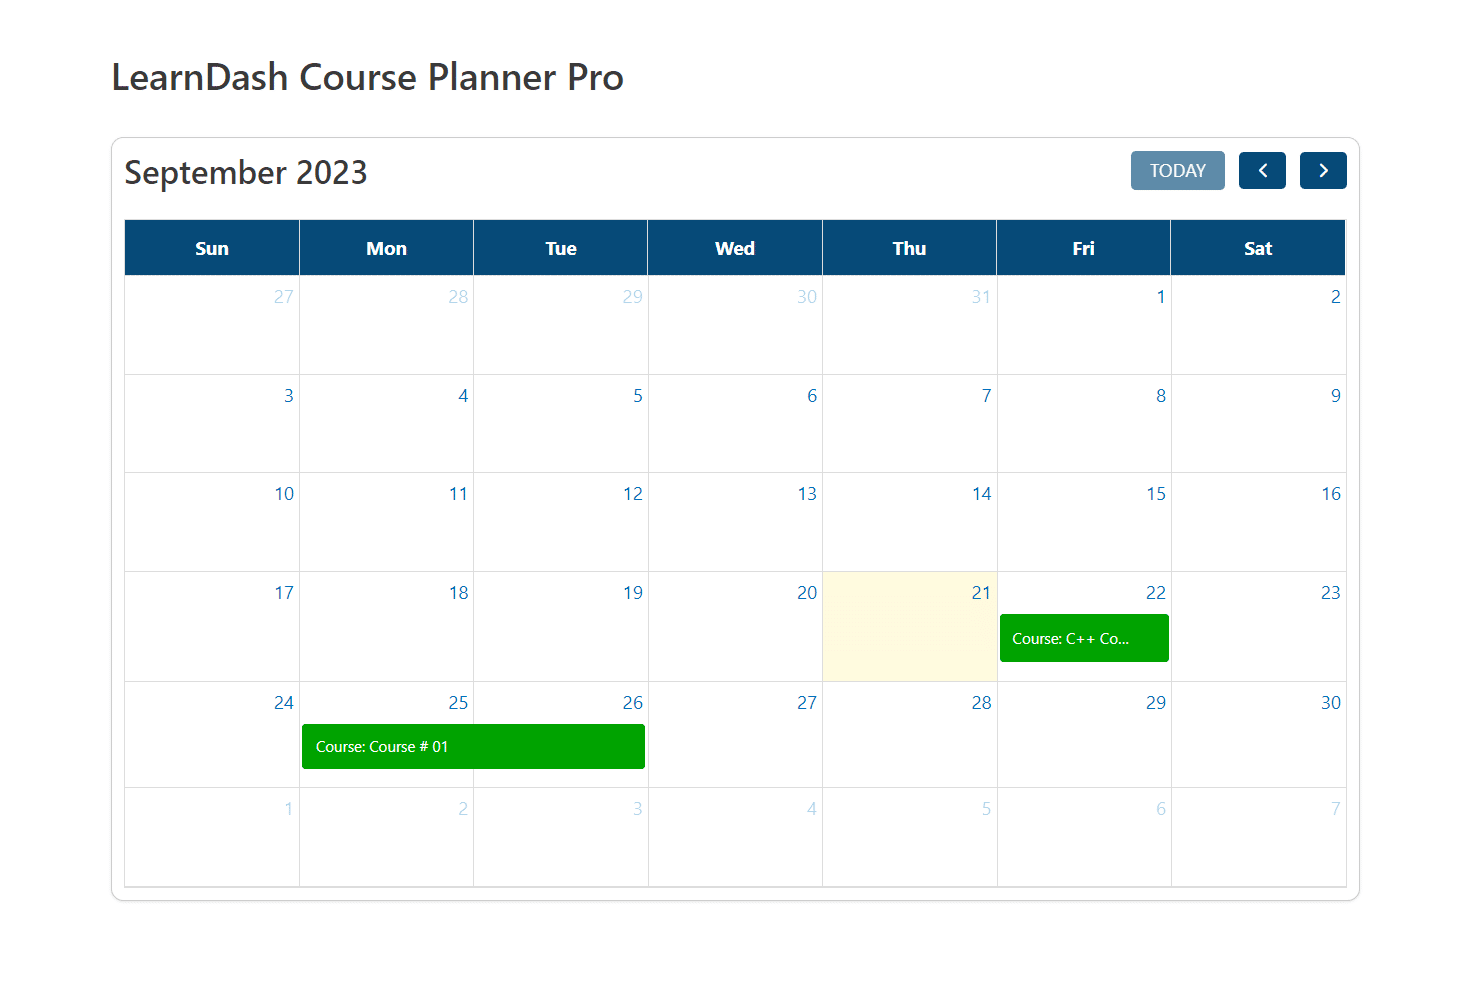
- Go to the Calendar from the Learndash Course Planner Pro menu on the dashboard.
- On the right side, all created courses are listed. Click on the “+” sign next to any course to view the Lessons associated with that specific course. Similarly, to view the Topics and Quizzes associated with a specific lesson, you have to click on the “+” sign next to each lesson.
- Select any course, lesson, topic, or quiz you want to schedule on a specific date(s). Drag and drop the content to the specific date on the calendar when you want it to be visible. Now that the specific course, lesson, topic, or quiz content will be visible to the users for scheduled dates.
- The scheduled course, lesson, topic, or quiz content will not be visible for enrolled users on any other dates.
Note: When you schedule a course, it automatically schedules all the lessons, topics, and quizzes contained within that course. Likewise, scheduling a lesson will schedule all the topics and quizzes within that lesson, and scheduling a topic will do the same for all the quizzes within that topic. This simplifies the scheduling process and ensures everything is coordinated seamlessly.
Popup Options
Once you drag and drop your chosen course, lesson, topic, or quiz onto the calendar, you can easily make further modifications. Simply click on the item in the calendar, and a pop-up will appear having multiple options.
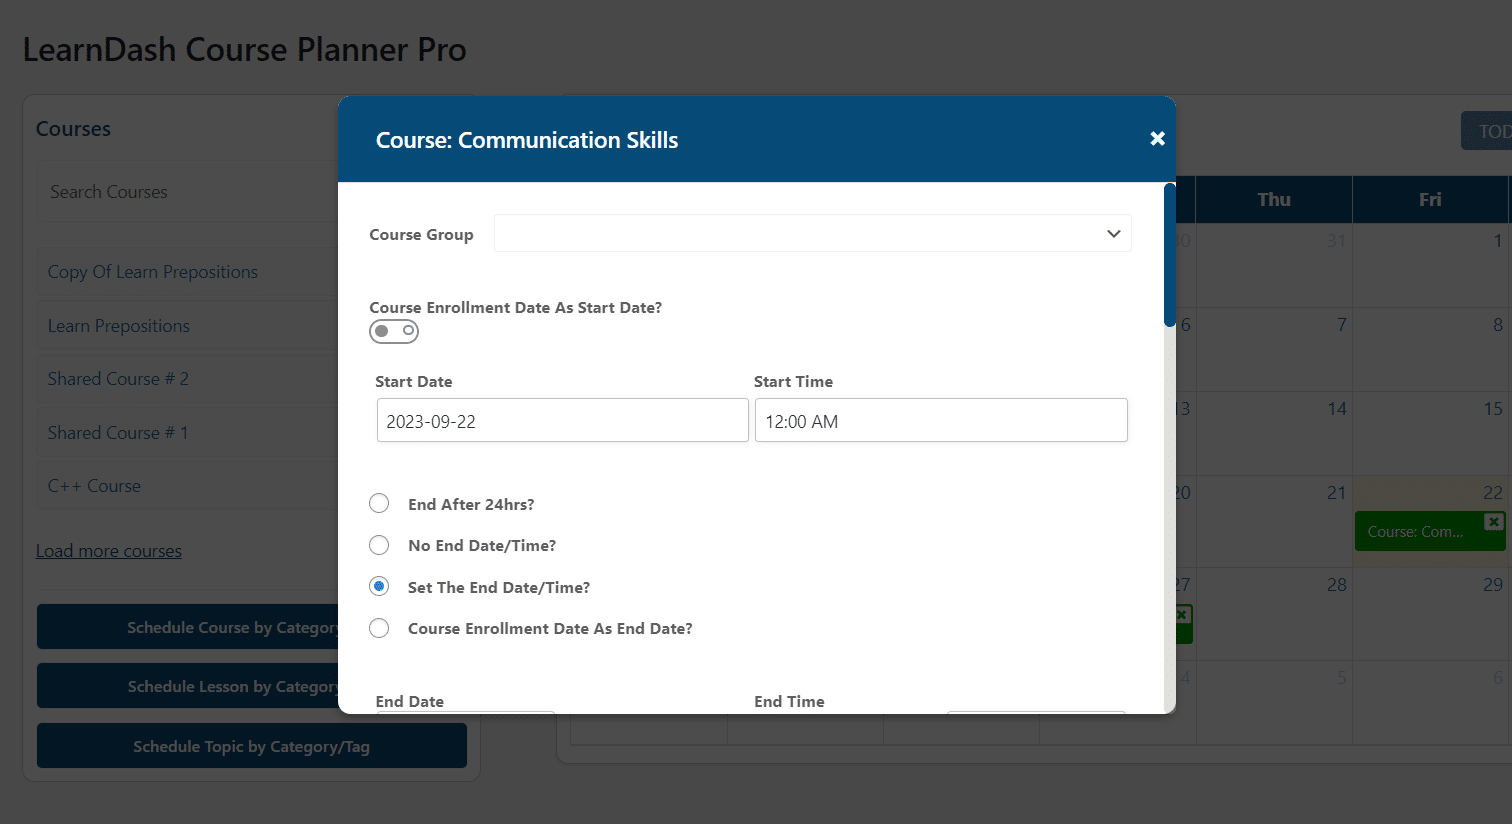
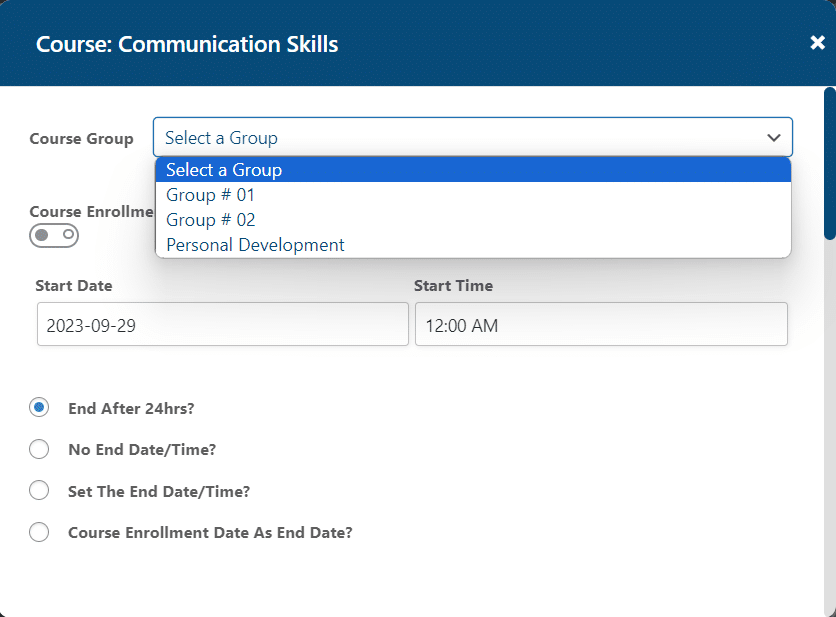
Course Group
Admins can conveniently manage the visibility of courses within a group by utilizing the Course Group option. By choosing a group from the dropdown menu, all the courses within that LearnDash Group can be scheduled. This means that the content of that specific group will either be visible (if the show option is enabled in the settings) or hidden (if the hide option is enabled in the settings).
Course Enrollment Date as Start Date
The admin can select the course enrollment date as the course start date. With this option, the course will begin when the student enrolls in the specific course.
With this option enabled, the schedule will be dynamically calculated based on the user’s course enrollment date. The Start date will be the date when the user is enrolled in that specific course, and the End date will be the combination of the start date and the interval. For example, if you set the interval to 3 days, then the course will only show for the first 3 days after the user’s enrollment.
Note: This calendar entry will not be removed when the “current system date” has passed it.

End After 24hrs
The admin can set the content schedule to end automatically after 24 hours. The specific course, lesson, topic, or quiz content will be visible (if the show option is enabled from the setting) or invisible (if the hide option is enabled from the setting) for 24 hours.

No End Date/Time
The admin can set the content schedule for a lifetime period. The specific course, lesson, topic, or quiz content will be visible (if the show option is enabled from the setting) or invisible (if the hide option is enabled from the setting) for a lifetime period.

Set The End Date and time
The admin can set an end date and end time for the content’s schedule. The specific course, lesson, topic, or quiz content will be visible (if the show option is enabled from the setting) or invisible (if the hide option is enabled from the setting) for all dates between the two selected dates.

Course Enrollment Date As End Date
With this option, the course, lesson, topic, or quiz content will become visible (if the show option is enabled from the setting) or invisible (if the hide option is enabled from the setting) at the specified date, and the end date will be calculated based on the interval provided.
The Start date will be the date provided in the “Start date” option, and the End date will be the combination of the start date and interval. For example, if you set the interval to 3 days, then the course will only show for the 3 days, including the start date.

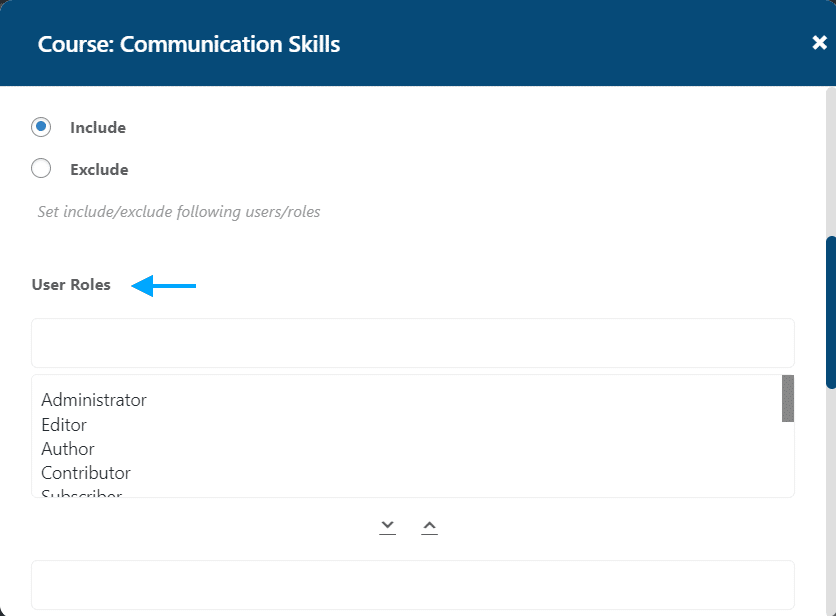
Include/ Exclude User Roles
By selecting the include or exclude option, the admin can allow or disallow the specific user roles for the content’s schedule. The specific course, lesson, topic, or quiz content will be visible (if the show option is enabled from the setting) or invisible (if the hide option is enabled from the setting) for the specific user roles that we selected from the user roles field.
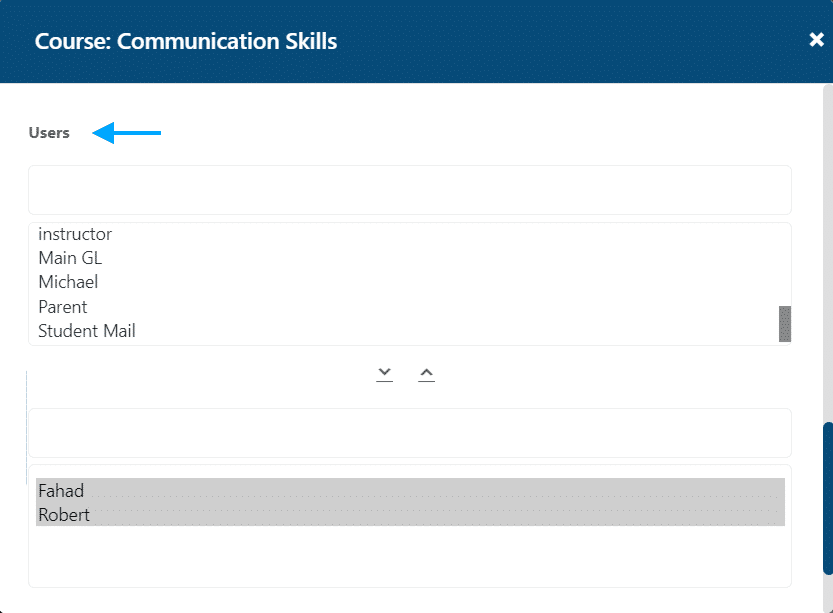
Include/ Exclude Users
By selecting the include or exclude option, the admin can allow or disallow specific users for the content’s schedule. The specific course, lesson, topic, or quiz content will be visible (if the show option is enabled from the setting) or invisible (if the hide option is enabled from the setting) for the specific users that we selected from the users field.
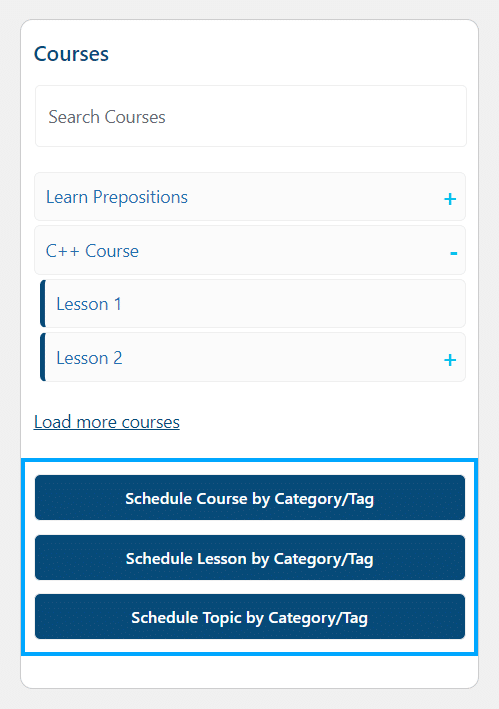
Scheduling by Category/Tag
Using this option, the admin can schedule courses/ lessons or topics to be hidden or shown according to a category or tag. All the courses/ lessons or topics that lie within the same category will be scheduled at once.
The following are the steps to schedule courses/ lessons or topics, according to their categories/tags:
- Go to Calendar from the LearnDash Course Planner Pro menu.
- On the right side of the calendar, click on the Schedule Course by Category/Tag or Schedule Lesson by Category/Tag, or Schedule Topic by Category/Tag option, as per your preference.
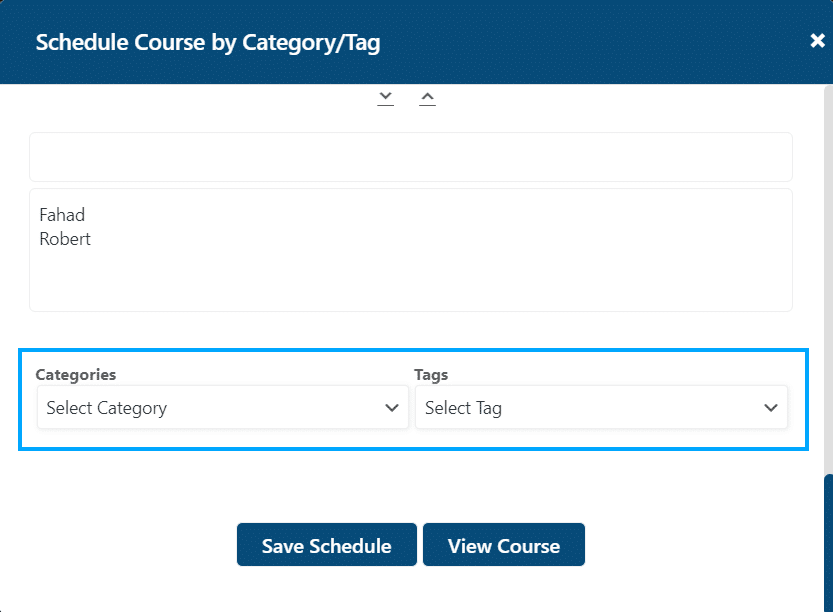
- Next, a pop-up window will appear.
- Select a Starting Date and Time and set your preferred option for the schedule to end.
- Select a User role from the Include/ Exclude – User Role option if you want to include or exclude any user roles.
- Enter the selected usernames in the Include/ Exclude – Users field if you want to include or exclude any user(s).
- Select the Category or Tag.
- Save the schedule.
Single Page Settings
Single-page settings will override the general settings selected for showing or hiding content.
Courses
The admin can change the settings for content visibility of any single course from its Edit page.
- Go to the Edit page of the selected Course.
- Go to the meta-box on the right side of the page and check Hidden for all users if you want to hide the course for all users.
- Select Show or Hide, according to your preference, from the Show/Hide dropdown.
- Publish or update the page.
Note: This setting will override the general settings for Show/Hide.
Lessons
The admin can change the settings for content visibility of any single lesson from its Edit page.
- Go to the Edit page of the selected Lesson.
- Go to the meta-box on the right side of the page and check Hidden for all users if you want to hide the course for all users.
- Select Show or Hide, according to your preference, from the Show/Hide dropdown.
- Publish or update the page.
Note: This setting will override the general settings for Show/Hide.
Topics
The admin can change the settings for content visibility of any single topic from its Edit page.
- Go to the Edit page of the selected Topic.
- Go to the meta-box on the right side of the page and check Hidden for all users if you want to hide the course for all users.
- Select Show or Hide, according to your preference, from the Show/Hide dropdown.
- Publish or update the page.
Note: This setting will override the general settings for Show/Hide.
Quizzes
The admin can change the settings for content visibility of any single Quiz from its Edit page.
- Go to the Edit page of the selected Quiz.
- Go to the meta-box on the right side of the page and check Hidden for all users if you want to hide the course for all users.
- Select Show or Hide, according to your preference, from the Show/Hide dropdown.
- Publish or update the page.
Note: This setting will override the general settings for Show/Hide.
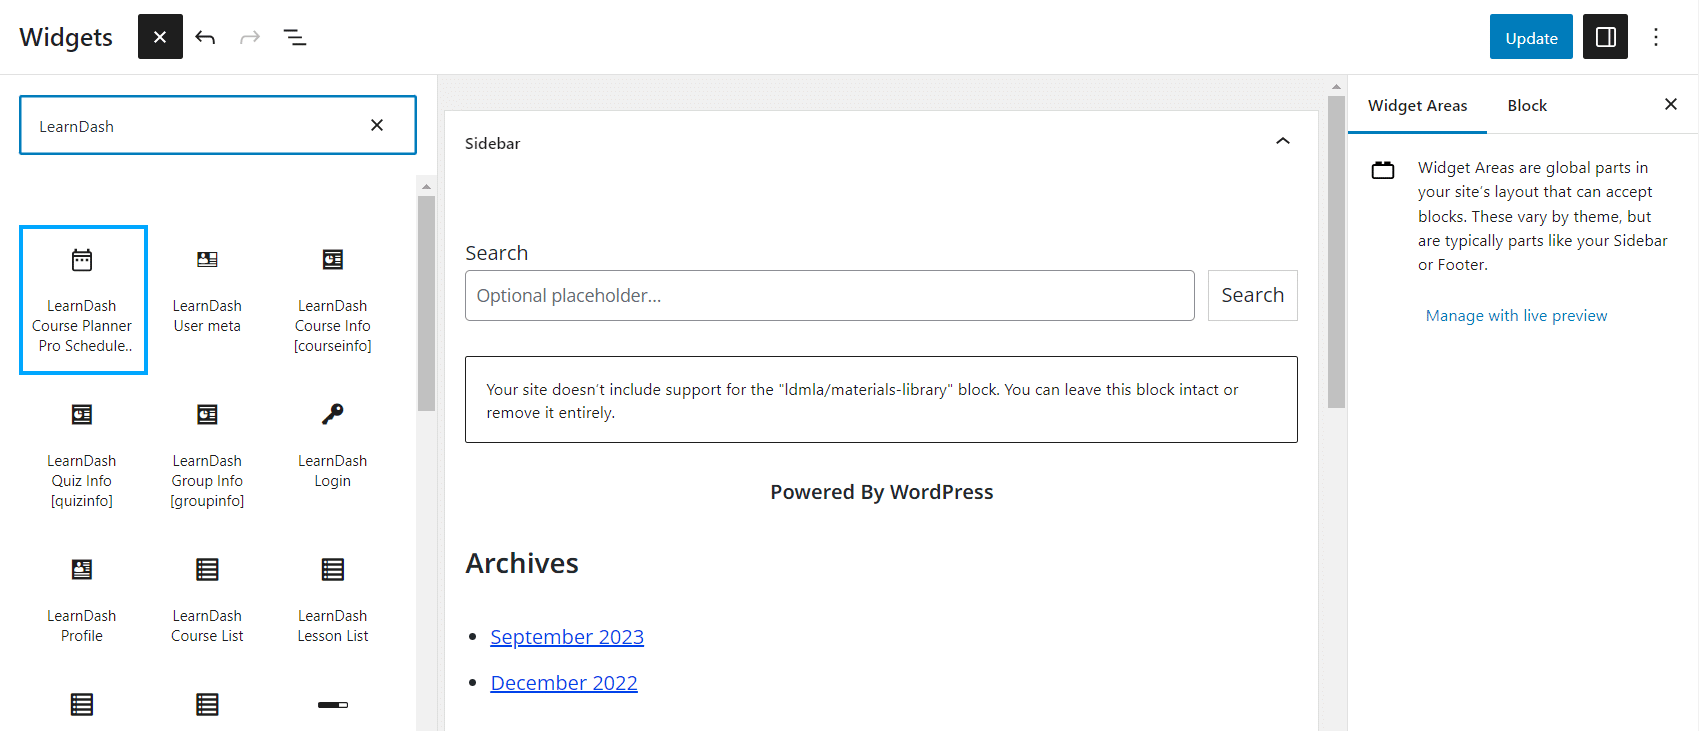
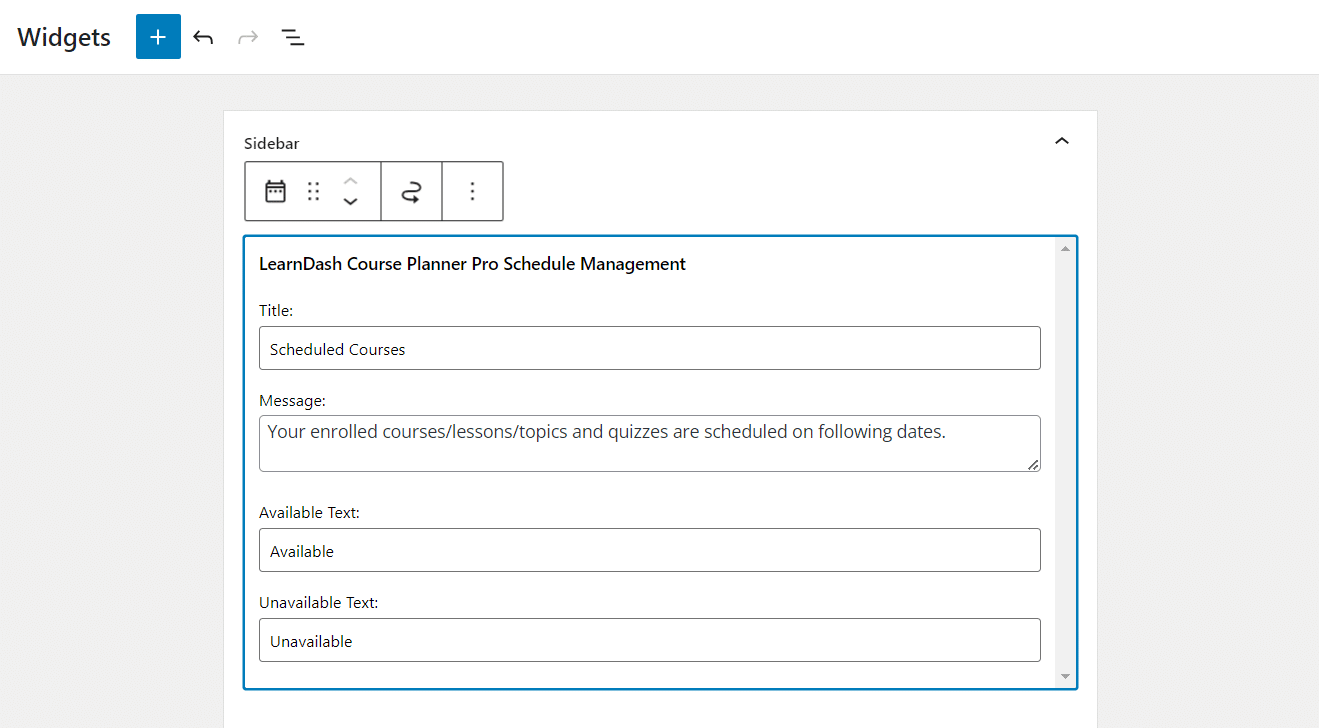
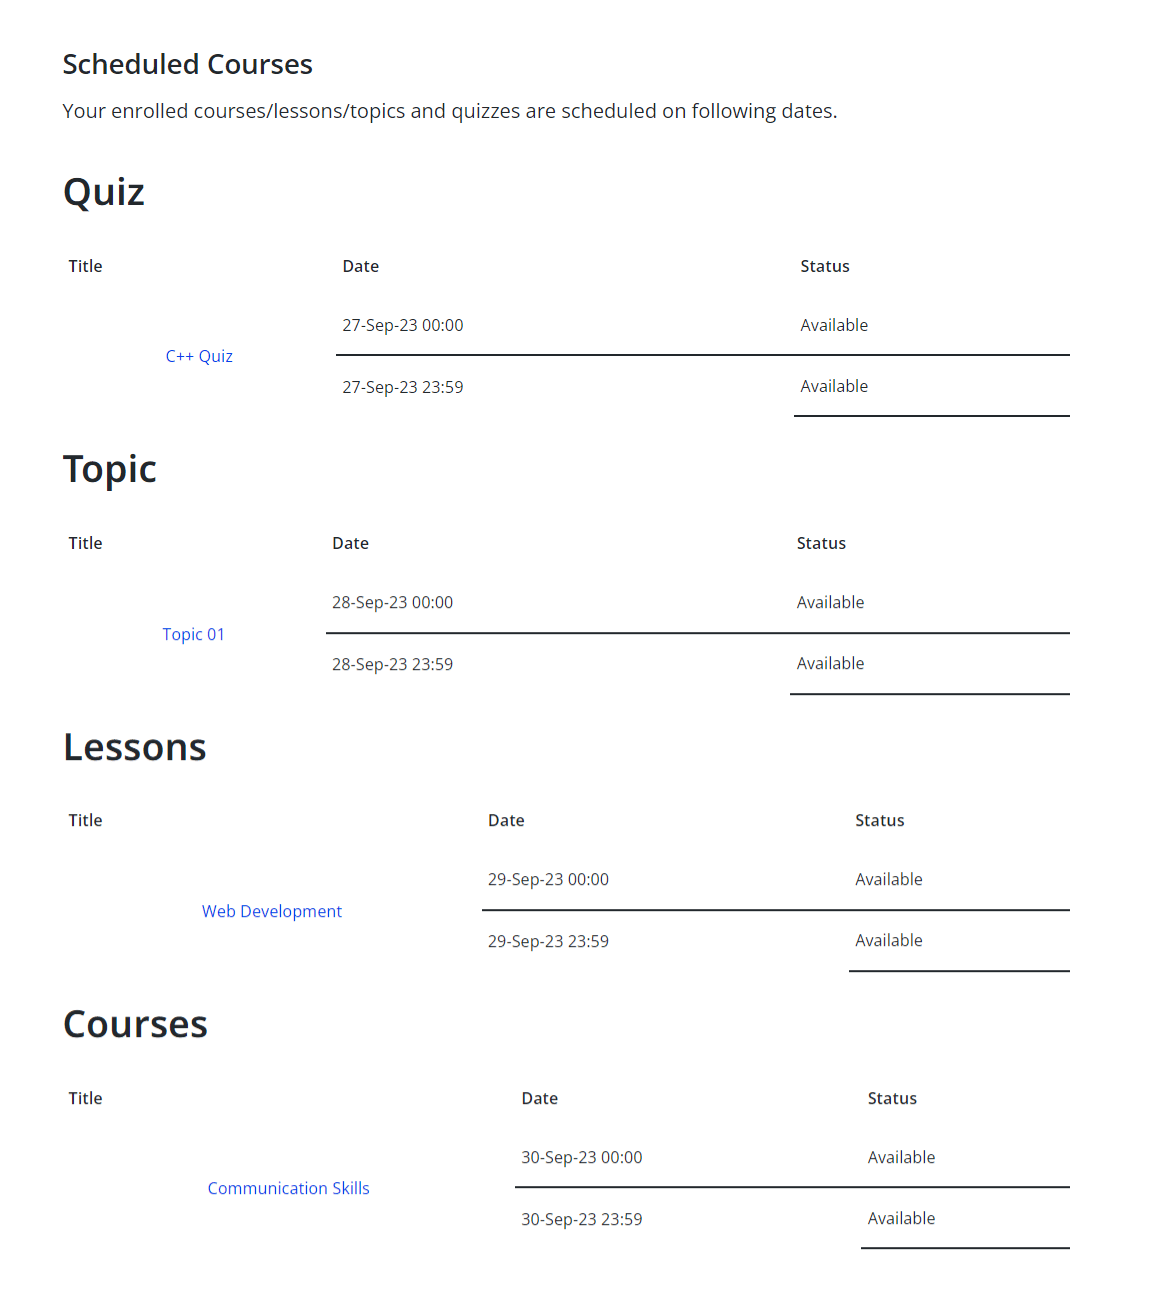
Widget
The LearnDash Course Planner Pro Widget allows you to display the available or unavailable scheduled dates for the user’s enrolled courses, lessons, topics, and quizzes.
To add the LearnDash Course Planner Pro Widget, follow these steps:
- Navigate to Appearance from the WordPress admin Dashboard.
- Search the LearnDash Course Planner Pro widget from the Available Widgets, and drag and drop it to the desired location.
- Enter a title for the widget area.
- Enter the Message, Available Text, and Unavailable Text to be displayed.
- Click Save and Done.
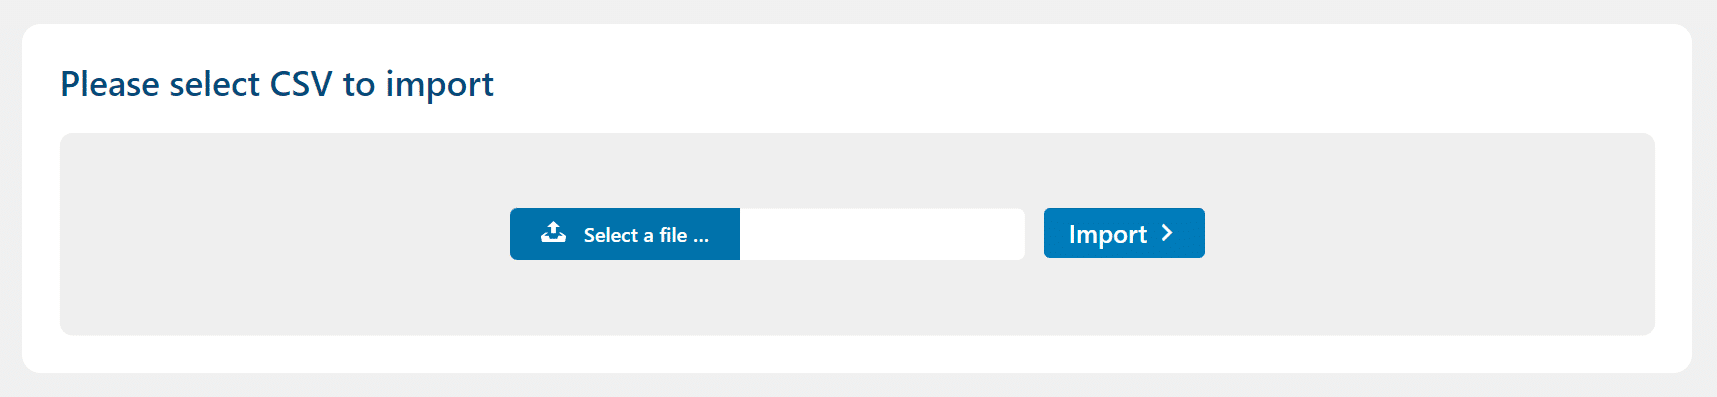
Import Events
The process of scheduling the courses/topics/lessons and quizzes can easily be done using the Import Events wizard. This feature allows users to schedule multiple courses, lessons, topics, and quizzes at once by importing a single CSV file. To access this feature, navigate to LearnDash Course Planner Pro Menu > Import Events > Upload the .csv file.
The standard .csv template is located inside the plugin zip file here, learndash-course-management-system > sample-import-files.
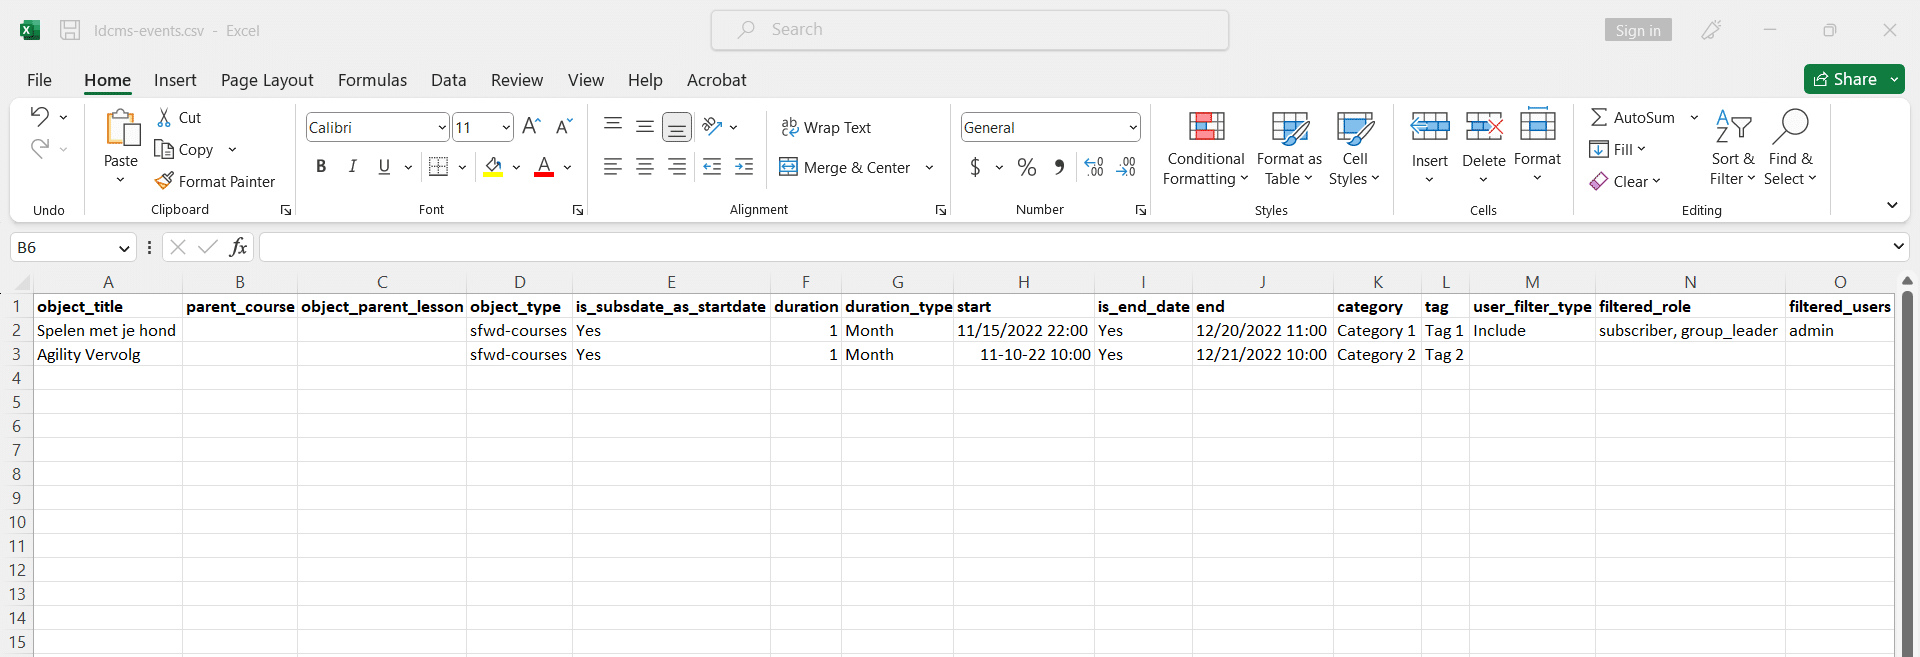
To upload the events, navigate to the “Import” tab. Use the sample CSV file provided with the plugin and update it with your data. The CSV file contains the following columns:
| Description | Values | Required | |
| object_title | Have to be the same exact name of the course, lesson, topic, and quiz being scheduled. | Course, topic, lesson, or quiz name | Yes |
| parent_course | When scheduling a lesson, topic, or quiz, this column is used to indicate the name of its Parent Course | Parent course name | No |
| object_parent_lesson | When scheduling a topic or quiz, this column is used to indicate the name of its Parent Lesson | Parent lesson name | No |
| object_type | Tells the system if the title belongs to a course, lesson, topic, or quiz | sfwd-courses or sfwd-lessons or sfwd-topic or sfwd-quiz | Yes |
| is_subsdate_as_startdate | Use this column to determine whether you want to use the course enrollment date as the start date | Yes / No | No |
| duration | if the is_subsdate_as_startdate is set to Yes, then you can use this column to add the events’ duration (indicating how long the content will be scheduled to be shown or hidden). | Numeric values(1 – 99) | No |
| duration_type | If an event duration is set, then this column will help you define whether the previous column refers to months or years. | Day, Month, or Year | No |
| start | Here you can determine the specific date when content will be shown or hidden. | Month/Day/Year You can add time in the following format: 00:00:00 AM | Yes |
| is_end_date | If you want to add a specific time to the schedule by which the course will be available or hidden | No | Yes |
| end | Use this column to set a specific date until which content will be available or hidden. | Month/Day/Year You can add time in the following format: 00:00:00 AM | Yes |
| Category 1 | Use this column to select the category you want to use if you wish to schedule courses by category | Category name | No |
| tag | Use this column to select the tag you want to use if you wish to schedule a course by tag. | Category Tag | No |
| user_filter_type | If you want to include or exclude certain users’ roles from the scheduled event, you must indicate so using this field. | Include or Exclude | Yes(Note: if scheduling is done for all students select “Include”) |
| filtered_role | If you wish to include or exclude specific user roles from the scheduled event, add the role names in this column. | Name of the user role. If multiple roles are included or excluded, separate them with a comma. | No – Leave blank for all user roles |
| filtered_users | If you wish to include or exclude specific users from the scheduled event, add their names in this column. | Names of included or excluded users are separated by a comma. | No – Leave blank for all users |
| ld_group | If you want to schedule content for a given LearnDash group, specify the group name here. | Group names | No |
FAQs
How are general setting options used?
There are two general setting options:
1. Hide courses, lessons, topics, or quizzes on the specific dates:
This option allows the admin to make courses, lessons, topics, and quizzes visible only on set dates of the calendar. For the rest of the dates, that specific course, lesson, topic, or quiz content will not be visible for the users.
2. Hide courses, lessons, topics, or quizzes on the specific dates:
This option allows the admin to hide courses, lessons, topics, and quizzes only on set dates on the calendar. For the rest of the dates, that specific course, lesson, topic, or quiz content will be visible for the users.
Can I create custom messages to inform users about the visibility of courses, lessons, topics, and quizzes?
Yes, you can easily create custom messages to share information about scheduling and visibility status for courses, lessons, topics, and quizzes. Go to the Course Scheduler Pro menu and select Settings. There you will find tabs for course messages, lesson messages, topic messages, and quiz messages. Go to any of these tabs and change the text according to your preference and scheduling settings. You can use [cs_scheduled_dates] to insert the scheduled dates into the message.
How can I schedule my course, lesson, topic, or quiz on the calendar?
On the left side of the calendar, you will find a list of all courses created. By clicking the “+” sign next to any course, you will be able to view all the Lessons and Quizzes associated with that specific course. Similarly, to view the Topics associated with a specific lesson, you have to click on the “+” sign next to each lesson. Select any course, lesson, topic, or quiz you want to show/hide during specific dates. Drag and drop the content you wish to schedule to the specific date on the calendar. Now, that specific course, lesson, topic, or quiz will be visible/invisible to the users on the scheduled dates.
How to set an end date for the course content’s schedule?
Follow these steps to set the end date/time for content schedules:
- From the WordPress dashboard, go to the Course Scheduler Pro menu and select Calendar.
- On the Calendar, click on the selected scheduled course, lesson, topic, or quiz. Next, a pop-up window will appear.
- Check the box next to the “Do you want to set the end date/time?” option.
- Select the End Date and enter the Time.
- Save the schedule.
How to exclude any user role from the schedule?
Follow these steps to exclude a user role from a schedule:
- From the WordPress dashboard, go to the Course Scheduler Pro menu and select Calendar.
- On the Calendar, click on the selected scheduled course, lesson, topic, or quiz. Next, a pop-up window will appear.
- Select the User role you wish to exclude from the Exclude User Role option.
- Save the schedule.
How to exclude any user from the schedule?
Follow these steps to exclude a specific user or users:
- From the WordPress dashboard, go to the Course Scheduler Pro menu and select Calendar.
- On the Calendar, click on the selected scheduled course, lesson, topic, or quiz. Next, a pop-up window will appear.
- Enter the username of the user you want to exclude from the schedule in the Exclude Users field. Multiple users can be added here.
- Save the schedule.
How can I schedule a group of courses of the same category/tag?
Follow these steps to schedule courses based on a category or tag:
- Go to the Calendar from the Course Scheduler Pro menu.
- On the left side of the calendar, click on the Schedule Course by Category/Tag option. Next, a pop-up window will appear.
- Select the Starting Date, Time, Category, or Tag.
- Save the schedule.
What to do when scheduling lessons of the same category/tag?
Follow these steps to schedule lessons based on their categories/tags:
- Go to Calendar from the Course Scheduler Pro menu.
- On the left side of the calendar, click on the Schedule Lessons by Category/Tag option. Next, a pop-up window will appear.
- Select the Starting Date, Time, Category, or Tag.
- Save the schedule.
What to do when scheduling Topics of the same category/tag?
Follow these steps to schedule topics based on their categories/tags:
- Go to Calendar from the Course Scheduler Pro menu.
- On the left side of the calendar, click on the Schedule Topics by Category/Tag option. Next, a pop-up window will appear.
- Select a Starting Date, Time, Category, or Tag.
- Save the schedule.
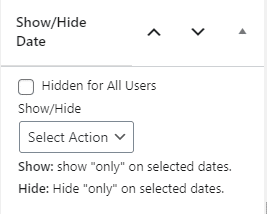
Can I set different Show/Hide settings for any single course, lesson, topic, or quiz?
Yes, you can do so by following these steps:
- Go to the Edit page of the selected course, lesson, topic, or quiz.
- Go to the meta-box on the right side of the Edit page titled Show/Hide Date.
- Select Show or Hide for the Show/Hide dropdown.
- Publish or update the page.
Note: This setting will override the general settings for Show/Hide.
I have selected “show course, lesson, topic or quiz on the specific dates” but the course/lesson/topic/quiz is not visible on the selected date.
Make sure that you haven’t accidentally selected the Hide option on the Show/Hide Date meta-box on the right side of the Edit page for the course, because it will override the general settings for the Show settings.
I have selected “hide course, lesson, topic or quiz on the specific dates” but the course/lesson/topic/quiz is visible on the selected date.
Make sure that you haven’t accidentally selected the Show option on the meta-box Show/Hide Date on the right side of the Edit course page, because it will override the general settings for the Hide settings.
How can course instructors schedule a course, lesson, or topic on the calendar without accessing the backend?
Add the shortcode [course_managment_system_calender] on any page to show a calendar and message tabs on the frontend. Users with the LearnDash group leader roles will be the only ones able to view this page’s content.
Can I schedule any specific lesson with a specific LearnDash Group?
Yes, you can. After scheduling the lesson, click on the scheduled lesson on the calendar. Next, a pop-up will appear on screen where you can select which group you want to schedule your lesson with.
Can I schedule any specific topic with a specific LearnDash Group?
Yes, you can. After scheduling the topic, click on the scheduled topic on the calendar, and a pop-up will appear. There, you can select which group you want to schedule your topic with.
Can I schedule any specific Quiz with a specific LearnDash Group?
Yes, you can. After scheduling the Quiz, click on the scheduled quiz on the calendar, and a pop-up will appear. You can select which group you want to schedule your quiz for.
Changelogs
1.16.2
- Fix: Optimized plugin performance and accessibility standards based on PHPCS recommendations.
1.16.1
- Fix: Improved excluded user and role loading when creating or editing calendar events.
- Fix: Prevented empty selected role data from causing warnings in the excluded users AJAX response.
- Fix: Improved license settings output when the license handler is unavailable or the license is already active.
1.16.0
- New: Added group-level message overrides for course/lesson/topic/quiz messages based on LearnDash group membership.
- Fix: Restored the “Show/Hide Date” sidebar metabox and improved saving for Gutenberg/LearnDash screens.
- Fix: Prevented students from editing calendar events (drag/drop/resize) and tightened calendar access checks.
- Fix: Separated “Hidden for All Users” and “Parent hidden” messages for topics/quizzes and corrected lesson parent messaging.
1.15.13
- Fix: Fixed minor issues.
1.15.12
- Fix: Addressed security vulnerabilities and improved overall plugin security.
1.15.11
- Fix: Resolved an issue where a course enrollment end-date entry was deleted on the next date after the entry was created.
- Fix: Fixed an issue where calendar entries were saved but did not display after editing.
- Fix: Fixed an issue where intervals set using the course enrollment start date were not working correctly.
1.15.10
- Fix: Resolved a minor functionality issue to improve stability.
- Fix: Addressed security and performance enhancements for improved reliability.
1.15.9
- Fix: Resolved an issue where the “course enrollment date as start date” feature was not working when the “hide course” option was enabled.
- Fix: Fixed the user search functionality in the popup, which was not working properly for a large number of users.
- Fix: Improved the frontend popup UI compatibility for certain themes.
1.15.8
- Fix: Fixed the issue where email trigger on completed courses.
- New: Individual course-specific emails can now be configured, which will override the global email settings for those courses.
1.15.7
- Fix: Fixed PHP deprecation warnings for dynamic properties in license.
1.15.6
- Fix: Fixed the issue of preview page not loading.
1.15.5
- Fix: Fixed the issue of course not displaying after adding to calendar.
1.15.4
- Fix: Fixed the issue of course disappearing after saving for group admin.
- Fix: Fixed the issue of all courses page with elementor.
1.15.3
- Fix: Fixed the issue of user role adjustment in calendar for Group Leaders.
1.15.2
- Fix: Fixed the issue of group admins could see all users.
1.15.1
- Fix: Fixed the issue of group admins could see other groups that they are not part of.
- Fix: Fixed the issue of users could see the schedule they are not part of.
1.15.0
- New: The addon’s new UI has been implemented on both the backend and frontend screens.
- New: The filter hook ‘ldcms_pro_calender_event_id’ is added to allow 3rd party developer to manage the event index on the calendar course popup
- New: The new option is added to set the course end date as the end date of the event.
- Change: The calendar date time format is updated to the civilian time ( 12 Hours ) format rather than army time ( 24 Hours )
- Fix: The group reminder email notification issue has been fixed.
1.14.0
- New: Added Netherland language support.
- New: Added French and Spanish translation strings.
- New: Added more end date options i.e. ‘End after 24hrs?’, ‘No end date/time?’, and ‘Set the end date/time?’ options.
1.13.0
- New: Added new admin settings to exclude the selected user roles from the scheduling like administrators, group leaders, etc.
- New: Improved the popup loading speed and added the preloaders.
- New: Added two new shortcodes i.e. [cs_scheduled_dates_start_only] and [cs_scheduled_dates_end_only] in the course/lesson/topic/quiz messages and availability email.
- Fix: Fixed the Learndash course Elementor’s template restriction issues.
- Fix: Fixed the date format in the excel sheet of import feature.
- Fix: Added the detailed Calendar event titles
- Fix: Fixed the subscription date as the start date function.
- Fix: Fixed the user-specific data in [ld_cms_user_calendar] shortcode.
- Fix: If the user selects a specific group(s), then the user list will be filtered based on that specific group(s) on the calendar popup.
- Fix: Fixed the error messages on the event popup.
- Fix: Added the restriction where the end date is always greater than the start date on the event popup.
- Fix: Updated the multilingual strings.
- Fix: Fixed the popup UI.
1.12.0
- New: Added Import feature.
- New: Responsive backend Calendar
- Fixed User-specific shortcode issue
1.11.0
- New: Added Group selection option on courses, lessons, topics, and quiz edit popups.
- New: Added redirect link to view the courses, lessons, topics and quiz page on admin, [ld_cms_user_calendar] and [ld_cms_calendar] calendars.
- New: Added the multi-user role option to manage the courses, lessons, topics, and quizzes in the [ld_cms_calendar] shortcode.
- Fix: Fixed the timezone issue on the frontend courses, lessons, topics, and quiz pages.
- Fix: Fixed the multilingual issues.
1.10.0
- New: Added accurate group, courses, lessons, and topics-based popup titles.
- New: Improved the group, courses, lessons, quizzes, and topics title on the calendar.
- Fix: Fixed the ‘Schedule Lesson by Category/Tag’ and ‘Schedule Topic by Category/Tag’ calendar popups.
- Fix: Fixed the Group Leader calendar.
- Fix: Fixed the courses/lesson/topic/quizzes calendar’s edit popup.
- Fix: User can only see his courses/lesson/topic/quizzes on the [ld_cms_user_calendar] shortcode.
- Fix: Fixed the “Do you want to set the end date/time?” field of the calendar event popup.
- Fix: Fixed ajax error when navigating the Calendar tab.
- Fix: Fixed the “Course Availability” Email.
- Fix: Fixed UI issue.
- Fix: Fixed Notices.
1.9.2
- Fix: Schedule popup categories/tags dropdown does not load properly.
1.9.1
- Fix: Lesson scheduling not working properly.
- Fix: Blank event popup on clicking event in ld_cms_user_calendar shortcode.
- Fix: Notices.
- Fix: Typos.
1.9
- New: Upgraded Calendar.
- New: Improved UI/UX.
- Fix: JS/jQuery errors in WordPress 5.6 and later.
1.8
- New: Added tooltip for event details quick overview on mouse-over.
- Fix: Topics do not hide if parent lesson or course is hidden.
- Fix: Group Leader can access all courses.
- Fix: Cleanup overall UI elements on backend and frontend calendars.
1.7
- New: Course Availability Email Reminder.
- New: Option to hide courses from the course listing page when the course is scheduled unavailable for the current user can be turned on/off through the plugin settings page.
- New: Course Group option at Lesson/Topic/Quiz calendar event popup.
- Fix: In the admin calendar popup, some content hides if it is greater than popup height.
- Fix: Inserted links and images in course content messages settings, got messed up when saved.
1.6
- New: Added new widget to display scheduled courses/lessons/topics/quizzes on sidebar.
- Fix: Fixed full calendar CSS conflict.
- Fix: Fixed course load issue on calendar pages.
1.5
- New: Made the add-on compatible with LearnDash labels.
1.4
- New: Option to hide all the courses/lessons/topics/quizzes for all users at once.
1.3
- New: Added option to select course/lesson/topic/quiz enrolled date as schedule start date.
- New: Added option to select include/exclude users when scheduling courses/lessons/topics/quizzes.
- New: Allowed group leaders to schedule courses/lessons/topics/quizzes from front-end.
- New: Allow group leaders to customize course/lesson/topic/quiz show/hide messages.
- New: Added option to select time zone from setting page.
- New: Added shortcode to display calendar on front-end for group leaders.
1.2
- New: Made the add-on compatible with the latest versions of LearnDash (3.0.4) and WordPress (5.2.1)
- Fix: Multiple scheduling of same tag courses displaying issue.
1.1
- New: Made the add-on compatible with LearnDash Course Builder.
- New: LearnDash lessons/topics/quizzes can be scheduled differently according to their parent courses.
- New: Made the add-on compatible with latest WordPress version 5.1
- Fix: Fixed the content disappearing issue when putting the courses/lessons/topics/quizzes to the calendar.
